Set Up Add/Drop Courses and Student Registration
Warning
The Student Registration feature is intended to replace the Add/Drop Courses feature. The Student Registration feature encompasses the elements of the Add/Drop feature, but it is greatly enhanced so that students are guided to register for courses that fit their academic plan or degree audit.
Note
The Add/Drop Courses feature is also called the Course Schedules feature in some places, such as the Global Portlet Operations page.
J1 Desktop Setup
Create registration groups so that you can apply conditions to large groups of students rather than having to apply them individually to each student.
Open the Web Registration Group Definition window.
If the groups you need aren't already created, right-click and select Add Row.
Enter the Group Code and Description.
Click the Save icon on the main toolbar.
Note
You may see other columns, but they are not applicable in this step. Move on to assigning students to groups.
Access the Year Term Subterm window.
Check to see if the Web Group is already there:
On the Year/Term tab, select the checkboxes for years and terms you want to check. (For subterms, use the Year/Term/Subterm tab.)
Click the Year/Term Control for Web Registration Groups tab. (For subterms, use the Subterm Control for Web Registration Groups tab.)
If the group isn't there for the years, terms, and subterms you need, right-click, and select Add Row.
Make selections and entries in each column according to your school's policies, but be sure to select the group from the Web Group drop-down.
Click the Save button on the main menu.
Open the Student Information window, and select a student.
On the Student tab | Student Master subtab, in the Student's Groups group, select a Tel/Web group the drop-down list.
Click Save on the main toolbar.
Tip
You can also use a script to add multiple students at a time to the group.
Note
Tel/Web Group is another name for a Web Registration Group.
Open the Year Term Subterm window.
In the Year/Term tab | Year/Term subtab, select the checkboxes for the terms you want to assign.
In the Year/Term Control for Web Registration Groups tab, select the term, and edit any of these columns:
Begin and end dates for the Add period, the Drop period, and the Grade Blackout.
Select the Registration Clearance checkbox to require registration clearance for members of this group in the selected term. (Deselect the checkbox to permit these students to register without clearance.)
Select the Advisor Approval checkbox to require advisor approval for members of this group in the selected term. (Deselect the checkbox to permit these students to register without clearance.)
Select an Advising Cycle from the drop-down list, or else select the Ready for Advising Cycle checkbox. (This allows the Advising Manager in J1 Web to select the advising cycles for the web registration groups.)
Select a Plan Sensitivity from the drop-down list to configure how closely these students must follow their academic plan.
Click the Save icon on the main toolbar.
Open the Courses window, and click the Course tab.
Click on the Web subtab.
In the Show on Web drop-down list, choose how the class will be displayed on the web.
LMS & Web for Students and Faculty (All)
LMS & Web for Students Only
LMS & Web for Faculty Only
Web for Students Only
Web for Faculty Only
Web for Students and Faculty
None
LMS
In the CRM Display of Crosslisted Courses drop-down list, choose how crosslisted courses will be displayed. Ensure that you have the same setting for all the courses crosslisted with each other.
Display Child Course(s) on Parent Course List
Display Child Course(s) and Parent Courses Separately
None - do not display crosslisted courses in conjunction with each other
Select the Must Pay Course checkbox so that the registration will be in a 'Reserved' status until the student pays for the course. When the student pays for the course, then the status of the registration is changed from 'Reserved' to 'Current.'
Select the Available as a Public Registration Course checkbox if the course is to be available for registration by individuals who have not gone through a formal matriculation process. If you do not select this checkbox, the Public Registration icon will not appear with courses for guest logins.
Select the Requires Course Authorization for Registration checkbox if the course is one for which you want to restrict registration to the students who get a Course Authorization from the instructor of the course. When the instructor gives a Capacity authorization to the student, the Add checkbox becomes available to that logged-in student.
Note
For courses with the Requires Course Authorization for Registration checkbox selected, the Registration Office personnel can register students in the Student Registration window in J1 Desktop if the user has permissions to Override Course Authorization Required for Registration Errors on the CRM Module Permissions tab of the Registration Permissions window.
If you want the following dates for the course to be different than the dates set for the Term or Subterm, enter the dates as described below:
In the Add Begin Date and Add End Date columns, enter the date range users will be permitted to add courses.
In the Drop Begin Date and Drop End Date columns, enter the date range users will be permitted to drop courses.
Click the Restrict Registrations by Course and by Web Registration Group section. Only selected groups will be allowed to register for this course. If no groups are selected, anyone may register for this course.
Choose the appropriate setting in the Type of Registration Limit drop-down list.
Course: Students have to be in a selected Web Registration Group to register for the course. This allows you to limit which students can register in this course. Now only students in the selected Web Registration Groups will be able to register for this course.
Group: Students in a selected Web Registration Group can register only for courses for which this same setting is selected. For example, if you are using Public Registration and have a Web Registration Group for non-matriculated students, then they can be restricted to registering only for the courses flagged for Public Registration.
To add a group, choose a group in the Restrict Course Registration by Web Group group box, and click the Add button to add it to the Selected Web Registration Groups group box.
To remove a group, choose a group in the Selected Web Registration Groups group box and click the Remove button, which moves it to the Restrict Course Registration by Web Group group box.
You can designate Meeting Types so students know whether a course section is an online meeting, a lecture, a lab, or any types your has defined. Students see the Meeting Types when they view details of sections they see in the Course Search, the My Schedule feature, and on their planning calendar.
Note
Meeting Types are not mandatory, but they're useful to help students select sections.
First view the existing Meeting Types, and create more if you need them.
Open the Maintain Table Values window.
In the Column Name drop-down, select crs_meeting_type Course Meeting Type.
To add an item, right-click, and select Add Row.
Enter a Table Value (code) and a Table Description.
If you wish, add an Alternate Value 1 and an Alternate Value 2.
Click Save on the main toolbar.
Next, assign Meeting Types to course sections.
Open the Courses (or Courses Non-Traditional) window to the Course tab, Master 2 subtab.
Select a Meeting Type from the drop-down.
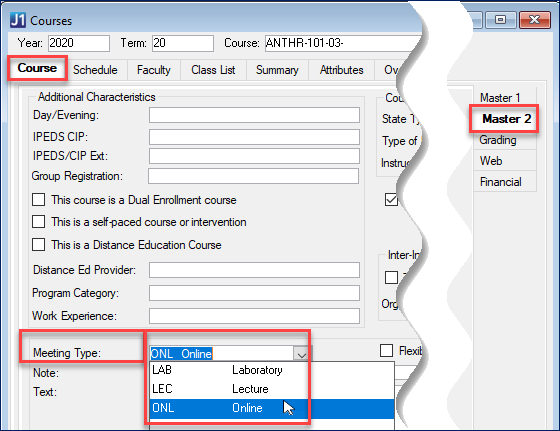
Click Save on the main toolbar.
Tip
If you prefer, you can use J1 Web to designate a section's Meeting Type. See instructions in the J1 Web Setup section below.
Open the Registration Configuration window.
Click the Configuration Table tab.
Select the Use automatic Drop for expired Reserved Courses checkbox if Must Pay courses or courses not approved by the student's advisor will be dropped automatically by the system. If you do not select this checkbox, these courses will not be automatically dropped. If you choose to use this option, set the following parameters:
Enter (in minutes) how often the system is to check for expirations.
Select the For Courses Requiring Payment checkbox if Must Pay courses will be dropped automatically by the system and enter (in hours) how long a Must Pay course can remain in reserved status.
Select the For Courses Requiring Advisor Approval checkbox if courses not approved by the student's advisor will be dropped automatically by the system and enter (in hours) how long a course requiring Advisor Approval can remain in reserved status.
Select the E-mail Student of impending Drop of Reserved Course? checkbox if you want the system to automatically send an email warning to the student before the course is automatically dropped and enter (in hours) how long before the course is dropped you want the email message to be sent.
In the Display of Crosslisted Courses drop-down list, choose the default value for how you want crosslisted courses to display. The default you select here may be changed in the Courses window.
The options in the Course Title to Display in the CRMs drop-down list allows users of the Campus Portal to determine what course title appears in the Campus Portal. You can include column names (CRS_TITLE, CRS_TITLE_2) and format strings (any alphanumeric characters, such as space, empty string, dash, comma, etc.). If you have more than one column name, you must include a format string before each additional column name, even if it is a blank string (identified by two commas). Following are examples of what the column name/format string displays:
CRS_TITLE: Only displays the text from the CRS_TITLE column
CRS_TITLE_2: Only displays the text from the CRS_TITLE_2 column
SHORT_CRS_TITLE_1: Only displays the text from SHORT_CRS_TITLE_1
CRS_TITLE,,CRS_TITLE_2: Displays CRS_TITLE and CRS_TITLE_2 without any characters between; because you did not put any characters between the commas, it is an empty format string
CRS_TITLE, (,SHORT_TITLE_1,): Displays CRS_TITLE with SHORT_TITLE_1 in parenthesis; if your CRS_TITLE was 'Beginning Accounting I' and your SHORT_TITLE_1 was 'for non-accounting majors' this would display as "Beginning Accounting I (for non-accounting majors)"
Select the For Course Search in CRM Student Search for Course Title checkbox if you want the Course Search to search on Course Titles. If both this checkbox and the Search for Short Title checkbox are selected, Course Search will search on both Course Titles and Short Titles.
Select the For Course Search in CRM Student Search for Short Title checkbox if you want Course Search in the Add/Drop Courses feature of CRM Students to search on Short Titles. If both this checkbox and the Search for Course Title checkbox are selected, Course Search will search on both Course Titles and Short Titles.
Select the For Course Details Note, Display Section Master Note checkbox if you want the Section Master Note to display on Course Details. If both this checkbox and the Display Section Schedules Comment checkbox are selected, both the Section Master Note and Section Schedules Comment will appear, separated by a dash.
Select the For Course Details Note, Display Section Schedules Comment checkbox you want the Section Schedules Comment to display on Course Details. If both this checkbox and the Display Section Master Note checkbox are selected, both the Section Master Note and Section Schedules Comment will appear, separated by a dash.
Select the Use Course Authorization checkbox if you want to use the Course Authorization feature or if you want Advisors during the Advisor Approval process to be able to override Course Full, Requisite, or Schedule Conflict registration errors.
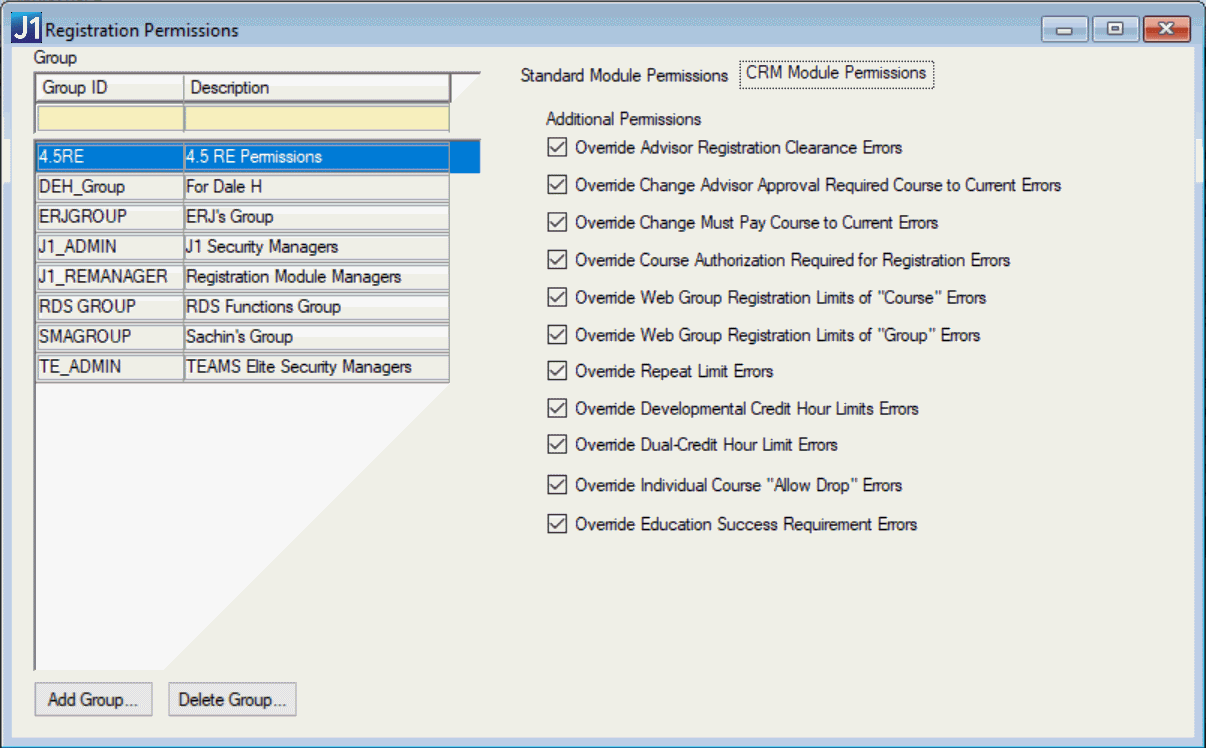
When a user attempts to register a student in J1 Desktop who requires Advisor Registration Clearance, J1 Desktop displays a registration error. The settings below allow you to control which groups of users may override the following web registration restrictions.
Open the Registration Permissions window.
Click the CRM Module Permissions tab.
For each Group:
Select Override Advisor Registration Clearance Errors if users in that group will be able to override Advisor Clearance. If you do not select this checkbox, users will not be able to override this error in the Student Registration window.
Select Override Change Advisor Approval Required Course to Current Errors if users in that group will be able to override the Advisor Approval Required error. If you do not select this checkbox, users will not be able to override this error in the Student Registration window.
Select Override Change Must Pay Course to Current Errors if users in that group will be able to override a Must Pay error. If you do not select this checkbox, users will not be able to override this error in the Student Registration window.
Select Override Course Authorization Required for Registration Errors if users in that group will be able to override a Course Authorization error. If you do not select this checkbox, users will not be able to override this error in the Student Registration window.
Select Override Web Group Registration Limits of "Course" Errors if users in that group will be able to override Registration Limits by Course error. If you do not select this checkbox, users will not be able to override this error in the Student Registration window.
Select Override Web Group Registration Limits of "Group" Errors if users in that group will be able to override Registration Limits by Group error. If you do not select this checkbox, users will not be able to override this error in the Student Registration window.
If you wish to display the location in the Campus drop-down list on the Course Search page:
Open the Maintain Location Master window.
Highlight each location that you want to display, and click the Show on Web checkbox.
Open the Hold Setup window and click on the Hold Definition tab.
Select the Show on Web checkbox for each Hold Code to be displayed in the Campus Portal.
Note
You may need to use the scroll bar at the bottom of the window to locate the Show on Web column.
J1 Web Setup
You can designate Meeting Types so students can search for sections by type such as Online, Lecture, Lab, or whatever types your school defines. Students search for courses in the Student Registration feature.
Note
Meeting Types are not mandatory, but they're useful to help students select sections.
Open the Manage Sections page.
Use filters to find the section you want.
On the Action drop-down next to your section, select Manage section details.
Click the Schedule tab.
Click Edit details.
In the Meeting Type drop-down, select a type.
Click Done editing.
Tip
Meeting Types are defined in J1 Desktop. If you prefer, you can use J1 Desktop to designate the Meeting Types of course sections, too. See the J1 Desktop Setup section.
On the Registration Administration hub, the Registration Module Manager administers several settings for the Campus Portal Student Registration feature.
Note
See the Registration Settings help topic in the J1 Web application for instructions.
Turn the feature on so that all students register in the Campus Portal using the Student Registration feature instead of the Add/Drop feature.
Select the number of days before the add/drop period that students can start using the calendar tool to plan their courses.
Select the fields you want available for course searches in the Student Registration feature.
Make the Meeting Type field searchable for students in the Course Search feature.
Open the Registration Settings page to the Campus Portal Course Search section.
Ensure the Meeting Type option is set to Yes.
Select the default withdrawal grade and the messages that appear when students attempt to withdraw from courses in the Student Registration feature.
Note
Many factors affect students' ability to withdraw themselves from courses. See the Overview of Student Withdrawal topic for more information.
Campus Portal Setup
These settings can be done by the Student Administrator and/or Advisor Administrator, depending on which role you want to do the setup. These settings will be applied to all instances (copies) of the page on which the feature is located.
Log in as the Campus Portal administrator.
Click the Admin this portlet link. The setup page appears.
In the Public Registration Login Password Request Form drop-down list, choose the request form that will be used by the Public Registration feature to request a login and password.
Note
This setting affects the feature only on the Add/Drop page and Student Registration page.
Tip
This form is used when new users request a login in order to register for a Public Registration course. You must create your Public Registration form in Form Builder before you can select it from the drop-down list. Prior to turning on Public Registration in the Add/Drop Courses or Student Registration feature, you must add the Public Registration feature to a page and use the feature to define the form.
Note
After the user completes the form, the New Account Messaging feature sends login and password information to the user to use to register for public registration courses.
Select or deselect the appropriate Portal Settings options.
Caution
These settings affect the Add/Drop Courses and Student Registration features on all pages of the portal.
Checkbox
Notes
Display the Course Method Column
Display All Courses, including Courses the Student Is Not Allowed to Add
On the Details Screen, Display the Link to a Catalog Page for each Course
Use the Catalog Master Extension window in J1 Desktop to store URLs for the desired Catalog Master records.
You may select multiple settings for Add/Drop functionality in the Add/Drop Settings group.
Checkbox
Notes
Allow students to register by Course Code
Allows students to type in a course number to select from a drop-down list instead of doing a search to select the course from a list.
Allow students to register by the Course Reference Number
Shows an additional "Add by Reference#" tab and uses the Account Number on the Courses window.
Make the "Add by Reference #" tab the default tab on the Add/Drop screen
Use the Advisor Approval Process for Selected Students
Allows students to register, at which time the courses are "reserved" for a designated period of time for advisors to approve the courseIf you have individual courses with Add/Drop dates that are different than the Year Term Subterm window settings, then Jenzabar recommends that you do not select this checkbox.
Hide the 'Notify Advisor' email link
Hides the link on the Add/Drop Courses and Student Registration page.
Use the Registration Clearance Process for Selected Students
Prevents a student from registering until the advisor has granted clearance in the Advisee Roster feature.
Use the Must Pay Course Process for Selected Courses
Places student registrations in a Reserved status until the student pays for the course.
Allow Guests to Request a Login so they can Register for Courses not Requiring Matriculation
Select only after you have installed the Public Registration feature and created the Public Registration form.
Allow Students to Edit the Credits Column for Courses with Variable Credit
Select only if you have courses that students may take for different amounts of credit and if you wish to allow them to enter the number of credits on the Add/Drop Courses page.
Allow Students to Edit the Credit Type for Courses with Variable Grading Type
Select only if you have courses that students may take for different types of credit and if you wish to allow them to select from the allowed Credit Types on the Add/Drop Courses or Student Registration page.
Allow Students to Add Themselves to a Waitlist for a Course that is full
Select if you have J1 Desktop configured to allow waitlisted registrations and you wish to allow students to register themselves with a waitlisted status.
Disable Add Courses buttons when Add Period is closed
If you have individual courses with Add/Drop dates that are different than the Year Term Subterm window settings, then Jenzabar recommends that you do not select this checkbox.
To edit the Personal Info Update form in Form Builder, click the Edit Personal Information Update Form link.
Select the checkbox labeled Allow advisors to confirm and update personal information on behalf of their advisees if you wish to allow this to happen.
To edit the Registration Agreement form in Form Builder, click the Edit Registration Agreement Form link.
Note
Students must agree to a registration agreement before they can register. This registration agreement is shown to students who are flagged in J1 Desktop as needing to agree in order to register.
Select the checkbox labeled Allow advisors to accept the agreement on behalf of their advisees if you wish to allow this to happen.
Click Save (or Cancel).