Online Payment Administration
Important
Information and features vary according to the roles to which you belong and the permissions associated with those roles. For more information, contact your module manager or your campus support team.
The Online Payment Administration feature allows you to configure the Campus Portal so that it can accept payments from constituents like Students, Donors, Candidates, etc.
Note
If your organization does not have an account with Authorize.Net, it must be established. Authorize.Net is currently the only third-party software provider that interfaces with the Campus Portal automatically.
Tip
Using the hosted payment option will help reduce the scope of work required when going through a PCI Self-Assessment Questionnaire. The hosted option will display a form from Authorize.Net within the Campus Portal where users can enter their payment information. With all cardholder information being entered in an Authorize.Net form that cannot be accessed by the Campus Portal, the questions of storing, processing, or transmitting cardholder data within Jenzabar or the Campus Portal are relieved. For more information, see PCI Self-Assessment Questionnaire A or A-EP.
Warning
An interface with CashNet is available through the Jenzabar Services team, but does not automatically connect with the Campus Portal.
Danger
With EX 7.4.1 or J1 2020.2 (and above), we are now integrating a payment form from Authorize.Net. Customers with certain content security policies or custom “response headers” cannot load the form. Please see the Troubleshooting section for details on how to test and update your form.
Setting Up Online Payment Administration
Use the following list as a guide to help you configure Online Payments

Enter the transaction code (AR Receipt code) to be used to record online payments in the Business Office.
Verify or establish how Accounts Receivable will handle online payments.

Verify or allow select JICS role(s) to administer payment configurations.
Determine how online gifts and other payments can be made and how they will be authorized via the Campus Portal.
Determine and configure the types of credit cards that can be accepted when a user makes an online payment.
Set up payment, payment method, and payment completion messages.
Preview & test payment form from the Online Payment Administration portlet.
Tip
If the form cannot load, see the Troubleshooting section.

Log on to Authorize.Net and configure your account settings.
Note
Additional settings are required if you use the hosted option. For more information, see the Defining Online Payment Settings below.
Once payments are made, log on to Authorize.Net to verify online payments.
Access the A/R Configuration window in J1 Desktop.
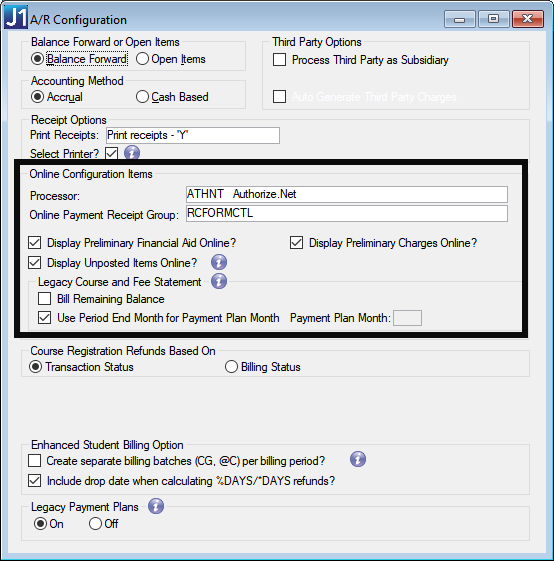
In the Online Configuration Items section, select the credit card processor to be used for online payments from the Processor drop-down. Jenzabar automatically provides several online credit card processors along with the authorization codes; however, your organization can choose to use your own processor. Be sure your organization has established an account with the processor in order to generate credit card authorizations.
From the Online Payment Receipt Group drop-down options, select the printer to be used. This determines the next receipt group number to be used for the online gift/payment.
If you want unapplied financial aid, unapplied student charges, or unposted/suspended items to appear on student accounts select the Display Preliminary Financial Aid Online?, Display Preliminary Charges Online?, and Display Unposted Items Online? checkboxes.
In the Course and Fee Statement section:
Note
This setup is needed only if you are using the My Account Info portlet. If your school is using the new Payment Plan and My Financial Accounts functionality you do not need this step.
Select the Bill Remaining Balance checkbox if the student's entire balance that is due for the payment plan will be shown on the statement. If you clear this checkbox, the next amount due as part of the payment plan will be shown on the statement.
Select the Use Period End Month for Payment Plan Month checkbox if you want the month from the period end date on the Subsidiary Control to be used to determine what payment plan transactions and balances will be displayed on the Course and Fee Statement generated in CRM Student. If you do not select this checkbox, you must enter a month in the Payment Plan Month column.
The Payment Plan Month column is only available if you did not select the Use Period End Month for Payment Plan Month checkbox. Enter the number of the month to be used for the Payment Plan.
Click the Save button.
Access the Receipt Code Control window in J1 Desktop.
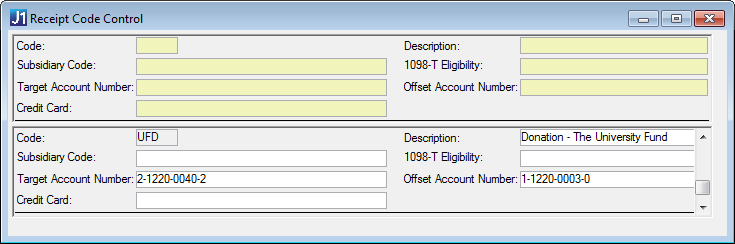
Right-click and choose Add Row. A new row appears.
In the Code column, enter the (Transaction) Code to be used to record fees in Business Office. This code is needed to record the gift/pledge in the proper General Ledger accounts.
In the Description column, enter a brief description for the code.
If applicable, select the appropriate Subsidiary Code from the drop-down options.
If applicable, select the appropriate 1098-T Eligibility code from the drop-down options.
If applicable, enter the General Ledger number for the credit or debit amount of the receipt in the Target Account Number column.
Tip
To browse for an account, right-click and select Account Number List.
From the Credit Card drop-down options, select the type of credit card to be used with this code.
Click the Save button.
Log in to the Campus Portal as an administrator and navigate to the appropriate feature page.
From the Admin Toolbar
 , click Access. The Access page appears. Campus Portal roles that have access to that page are indicated by a green visible
  symbol while roles that do not have access are indicated by the red hidden
  symbol.
Click on the Campus Portal role you are setting up permissions for. If the role has not already been granted access to the page, click the button to toggle it to Visible
 . Additional permissions appear.
To grant administrative privileges to a Campus Portal role, click the button for the Allow this role to manage this page permission to move the toggle to "Yes". Administrative permissions will allow the users in the role to add or remove features and set page and feature level permissions.
From the in Online Payment Administration they can: section, use the toggle buttons to set permissions.
To give this user role access to a global operation on the page, click on the button next to the global operation. The button toggles to Yes to indicate that the role now has that permission.
To remove this user role's access to a global operation on the page, click on the button next to the global operation. The button toggles to No to indicate that the role no longer has that permission.
Repeat for each permission option attached to the role.
Note
Changes are saved automatically.
Log into the Campus Portal as an administrative user.
From the Portal menu on the left-hand side, click the link that accesses the page with the Online Payment Administration feature. The Online Payment Administration feature is displayed.
From the Payment Administration feature, click Click here to administer the Payments Portlet. The Payment Administration page appears.

From the Is the Payment Portlet in testing mode options, select:
Yes if you are testing online gifts or student payments.
No if you are utilizing online gifts or student payments.
In the What is your Authorize.Net login ID column, enter the login ID your organization has established with Authorize.Net.
In the What is your Authorize.Net Transkey column, enter the transkey your organization has established with Authorize.Net.
In the Use Authorize.Net hosted payment form, choose yes or no to determine where users will make donations and payments.
Tip
Using the hosted payment option will help reduce the scope of work required when going through a PCI Self-Assessment Questionnaire. The hosted option will display a form from Authorize.Net within the Campus Portal where users can enter their payment information. With all cardholder information being entered in an Authorize.Net form that cannot be accessed by the Campus Portal, the questions of storing, processing, or transmitting cardholder data within Jenzabar or the Campus Portal are relieved. For more information, see PCI Self-Assessment Questionnaire A or A-EP.
Yes. Your organization wants users to enter payment information within an Authorize.Net hosted form to make donations and payments.
No. Your organization would like users to make payments within the Campus Portal.
Note
If you are using the new My Financial Accounts or Payment Plan features, you must select Yes and complete the Authorize.Net set up if you want students to be able to make online payments.
Click the Save button.
Note
If you are using Authorize.Net as a hosted payment option, make sure you complete the setup for the Online Payment Administration and the Account settings on Authorize.Net before making payment forms available to the public.
Log into the Campus Portal as an administrative user.
Navigate to the Payment Administration feature. The Payment Administration feature is displayed.
From the Payment Administration feature, click Click here to administer the Payments Portlet. The Payment Administration page appears.
Click Work with Credit Card. The Credit Card Configuration page appears.
To add a new credit card:
Click Add. The Add Credit Card page appears.
In the Credit Card column, enter a name for the allowed credit card being added.
In the Credit Card Description column, enter a brief description identifying the allowed created card being added.
Click the Add button. The Credit Card Configuration page reappears.
To update an existing credit card:
Click Modify. The Select Credit Card page appears.
From the Credit Card drop-down list options, select the credit card you are updating.
Click the OK button.
Update the Credit Card or Credit Card Description columns.
Click the OK button. The Credit Card Configuration page reappears.
To delete an existing credit card:
Click Remove. The Select Credit Card page appears.
From the Credit Card drop-down list options, select the credit card you are removing.
Click the OK button. The selected credit card is removed and the Credit Card Configuration page reappears.
Click Exit credit card administration.
From the Work with portlet specific payment configurations drop-down, select Online Giving. The Portlet Specific Payment Configuration page appears.
In the Payment Config Description, enter a description that will identify the payment entered is an online gift.
From the Authorize Payments options, determine how the donation will be authorized:
To authorize payments online and immediately debit the donor’s account using Authorize.Net, select Online.
To authorize payments offline and debit the donor’s account later using the Credit Card Authorizations window in J1 Desktop, select Offline.
From the Allow the following payment options, select the Credit Card and/or E-check checkboxes to determine what payment methods are available for donors.
In the Payment not authorized e-mail address (online only) column, enter an e-mail contact address for a person at your organization who needs to receive an e-mail message when an unauthorized payment is received. The e-mail address is only used for online payments.
From the Message Template Name drop-down sections, choose or create a message for the Payment Method and Make a Payment Messages.
To create a new message template:
Click the Add icon
 to the right of the Message Template Name drop-down options. The Add Message page appears.
In the Template Name column, enter a name identifying the message (required).
In the Message that will appear column, enter the message you want displayed to users.
Click the Save button. The Configure Payment Information page reappears.
To use the message you just created, ensure it is selected from the Message Template Name drop-down option.
To edit an existing message template:
From the Message Template Name drop-down options, select the message to be updated.
Click the Edit icon
 . The Edit Message page appears.
Update the Template Name and/or Message that will appear columns.
Click the Save button. The Configure Payment Information page reappears.
To delete an existing message template:
From the Message Template Name, select the message to be deleted.
Click the Delete icon
 . The message is deleted.
Click the Save button. The Payment Administration page reappears.
From the Work with portlet specific payment configurations drop-down, select My Account Info. The Portlet Specific Payment Configuration page appears.
From the Assign Year and Term to Total Account Balances and Total Plan Payments options, choose an option that will determine the year and term to be applied to online student account balance payments not already associated with a year/term (such as a total account balance plans not associated with a specific year/term or billing period).
Your Choice of Year/Term: choose a year/term option from the drop-down that will be assigned to student payment transactions not already associated with a year/term. The year/term options shown in this list are pulled from the Year Term Subterm window in J1 Desktop where the Show on Web flag is selected.
Current Year/Term: when selected, the current year/term will automatically be selected and assigned to any student payment transactions not already associated with a year/term. The current year/term is pulled from the Registration Configuration window in J1 Desktop.
Year/Term Based On Payment Date: if selected, the system will assign a year/term to a student payment transaction for whichever year/term is currently within the begin and end date range from the Year Term Subterm window in J1 Desktop.
Year/Term Of Student's Oldest Balance: if selected, the system will assign the year/term to a student payment transaction from the year/term of the student’s oldest balance due.
Note
This setting is shared with the My Financial Account feature. Changes made within either feature will be mirrored in the other.
In the Payment Config Description, enter a description that will identify the payment entered is an online payment.
Enter the transaction code (defined on the Receipt Code Control window) that will identify the transaction as an online payment.
From the Authorize Payments options, determine how the payment will be authorized:
To authorize payments online and immediately debit the user’s account using Authorize.Net, select Online.
Offline mode is not supported.
From the Allow the following payment options, select the Credit Card and/or E-check checkboxes to determine what payment methods are available for donors.
In the Payment not authorized e-mail address (online only) column, enter an e-mail contact address for a person at your organization who needs to receive an e-mail message when an unauthorized payment is received. The e-mail address is only used for online payments.
From the Message Template Name drop-down sections, choose or create a message for the Payment Method and Make a Payment Messages.
To create a new template, click the Add icon
and enter a new name and message that you want to display.To edit an existing template, click the Edit icon
and change the name or message content as needed.
Click the Save button. The Payment Administration page reappears.
If you are using the Authorize.Net hosted payment option, the Campus Portal will redirect users of the Make an Inquiry, Apply Online, Online Giving, FormFlow and My Account Info portlets to Authorize.Net to make a payment or donation.
Note
Users of the Payment Plans portlet and My Financial Account portlet will not need to configure completion messages.
After users successfully make a payment on the Authorize.Net hosted payment site, they will be provided with a link that will return them to a predetermined payment complete/incomplete page specific to the portlet.
Because the Campus Portal will not know if the payment/donation on the Authorize.Net website was successful, these message pages will need to be updated for the following portlets:
Tip
You will need to enter a generic message such as, "Thank you for sending your application. You will receive an email once it has been reviewed."
This portlet utilizes Form Builder to configure and display the completion messages. To change the completion message, follow the steps below:
Log in to the Campus Portal as an administrator and navigate to the appropriate feature page.
Select Admin this portlet link.
Click
Edit this form.Choose the
 Set up completion messages option.
Type a universal message in the Successful Submission window.
Click Save.
This portlet utilizes Form Builder to configure and display the completion messages. To change the completion message, follow the steps below:
Log in to the Campus Portal as an administrator and navigate to the appropriate feature page.
Select Admin this portlet link.
Click the Edit icon
next to the application where you want to change the completion message.Click
Edit this application.Choose the
Set up completion messages option.Type a universal message in the Successful Submission window.
Click Save.
The messages for this portlet cannot be managed within the Campus Portal site. To change the completion message for online giving, you will need to have permission to access and edit files located on the Campus Portal web server.
Go to the following directory: \Program Files\Jenzabar\ICS.NET\Portal\ClientConfig\HtmlContent\CRMConstituentOnlineGivingPortlet
Open the submission_failure_message.html file.
Type a universal message.
Save
Troubleshooting the Authorize.Net Hosted Form
Note
This section is for the Authorize.Net "hosted" option for JICS Campus Portal online payments.
Danger
With EX 7.4.1 or J1 2020.2 (and above), we are now integrating a payment form from Authorize.Net. Customers with certain content security policies or custom “response headers” cannot load the form.
Jenzabar online payments are now integrated with Authorize.Net. JICS Administrators should test their online payment form following the steps below.
Log into the Campus Portal as an administrative user.
Navigate to the Payment Administration feature. The Payment Administration feature is displayed.
From the Payment Administration feature, click Click here to administer the Payments Portlet. The Payment Administration page appears.
Click th Preview & test payment form link.
If the payment form preview works and the form test succeds, no further editing of the form is necessary.
If the payment form preview does not load, continue with the steps below.
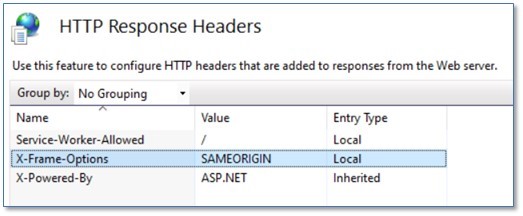
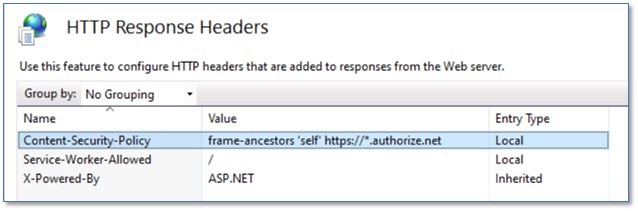
If the form loads but appears disabled behind a spinner indicator, it is likely that you have a “Response Header” or Content Security Policy (CSP) in place. Check by opening the Internet Information Services (IIS) Manager on your JICS server.
Navigate to the ICS application and select the folder.
In the pane on the right, double-click the HTTP Response Headers option. You may see one of two possible values:
Note
If you see either setting, it is preventing the Authorize.Net payment form from loading.
Replace with a Content-Security-Policy value of
frame-ancestors 'self' https://*.authorize.net. This setting will continue to protect your server, but it will allow forms only from Authorize.Net.
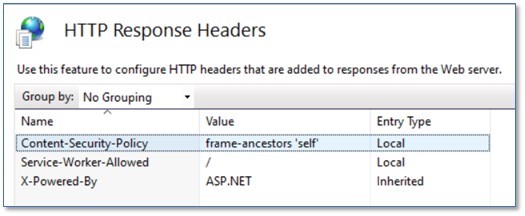
Note
If the Entry Type is Inherited , it means that the setting is most likely defined at the Default Web Site level and you will need to make your change there. Alternatively, you could change the web.config file instead of using the IIS Manager interface.

The new payment form in EX 7.4.1 and J1 2020.2 does not require Authorize.Net to “post back” to the JICS server. You can remove the Silent Post URL value that is configured in your Authorize.Net account. This will stop any error messages in the ICSNET event viewer log caused by unnecessary post-backs from Authorize.Net.