Setting Up My Academic Plan
Important
The My Academic Plan feature requires the school to be licensed for J1 Web Student Registration.
My Academic Plan is an optional feature in Campus Portal (JICS) that allows students to view their academic plans. Depending on how it is set up, students may be able to edit their plans, also. If they have permissions to edit plans, they can move requirements or courses to other terms, choose the course they will take to meet requirements, and even add or remove a term from their plan. System Administrators can set this up to require Advisor approval for changes, or for no permission required. Students use My Academic Plan in the Campus Portal, but there is setup that must be done in J1 Web, J1 Desktop, and Campus Portal before it can be used.
Warning
Academic Planning must be set to On in Advising Settings in order for students to use the My Academic Plan feature. This can only be done by a J1 Web user with Advising Administration permissions.
In J1 Web, go to the Advising Administration Hub, and select Manage Advising Settings in the Hub options menu.
In the Student Academic Planning block, set Academic Planning to On.
Danger
Once Academic Planning is activated, it cannot be disabled! If you activate it and then opt to not use it, the J1 Desktop and Campus Portal workflow will be impacted. For more information about turning on and using Academic Planning, see the Academic Planning section of J1 Web Online Help.
To allow students to edit plans in the Campus Portal:
Switch the Approval Process toggle to On.
Note
Note that turning the Approval Process on only allows students to view their academic plans. Students will not be able to edit plans until you complete the configuration (step 3).
Choose whether you will set permissions for groups of students based on Web Groups or on Program (major).
Then click the Configure Now link to set up permissions for students to interact with their academic plan.
Find the program/major or the web group that you want to be able to edit their student plans.
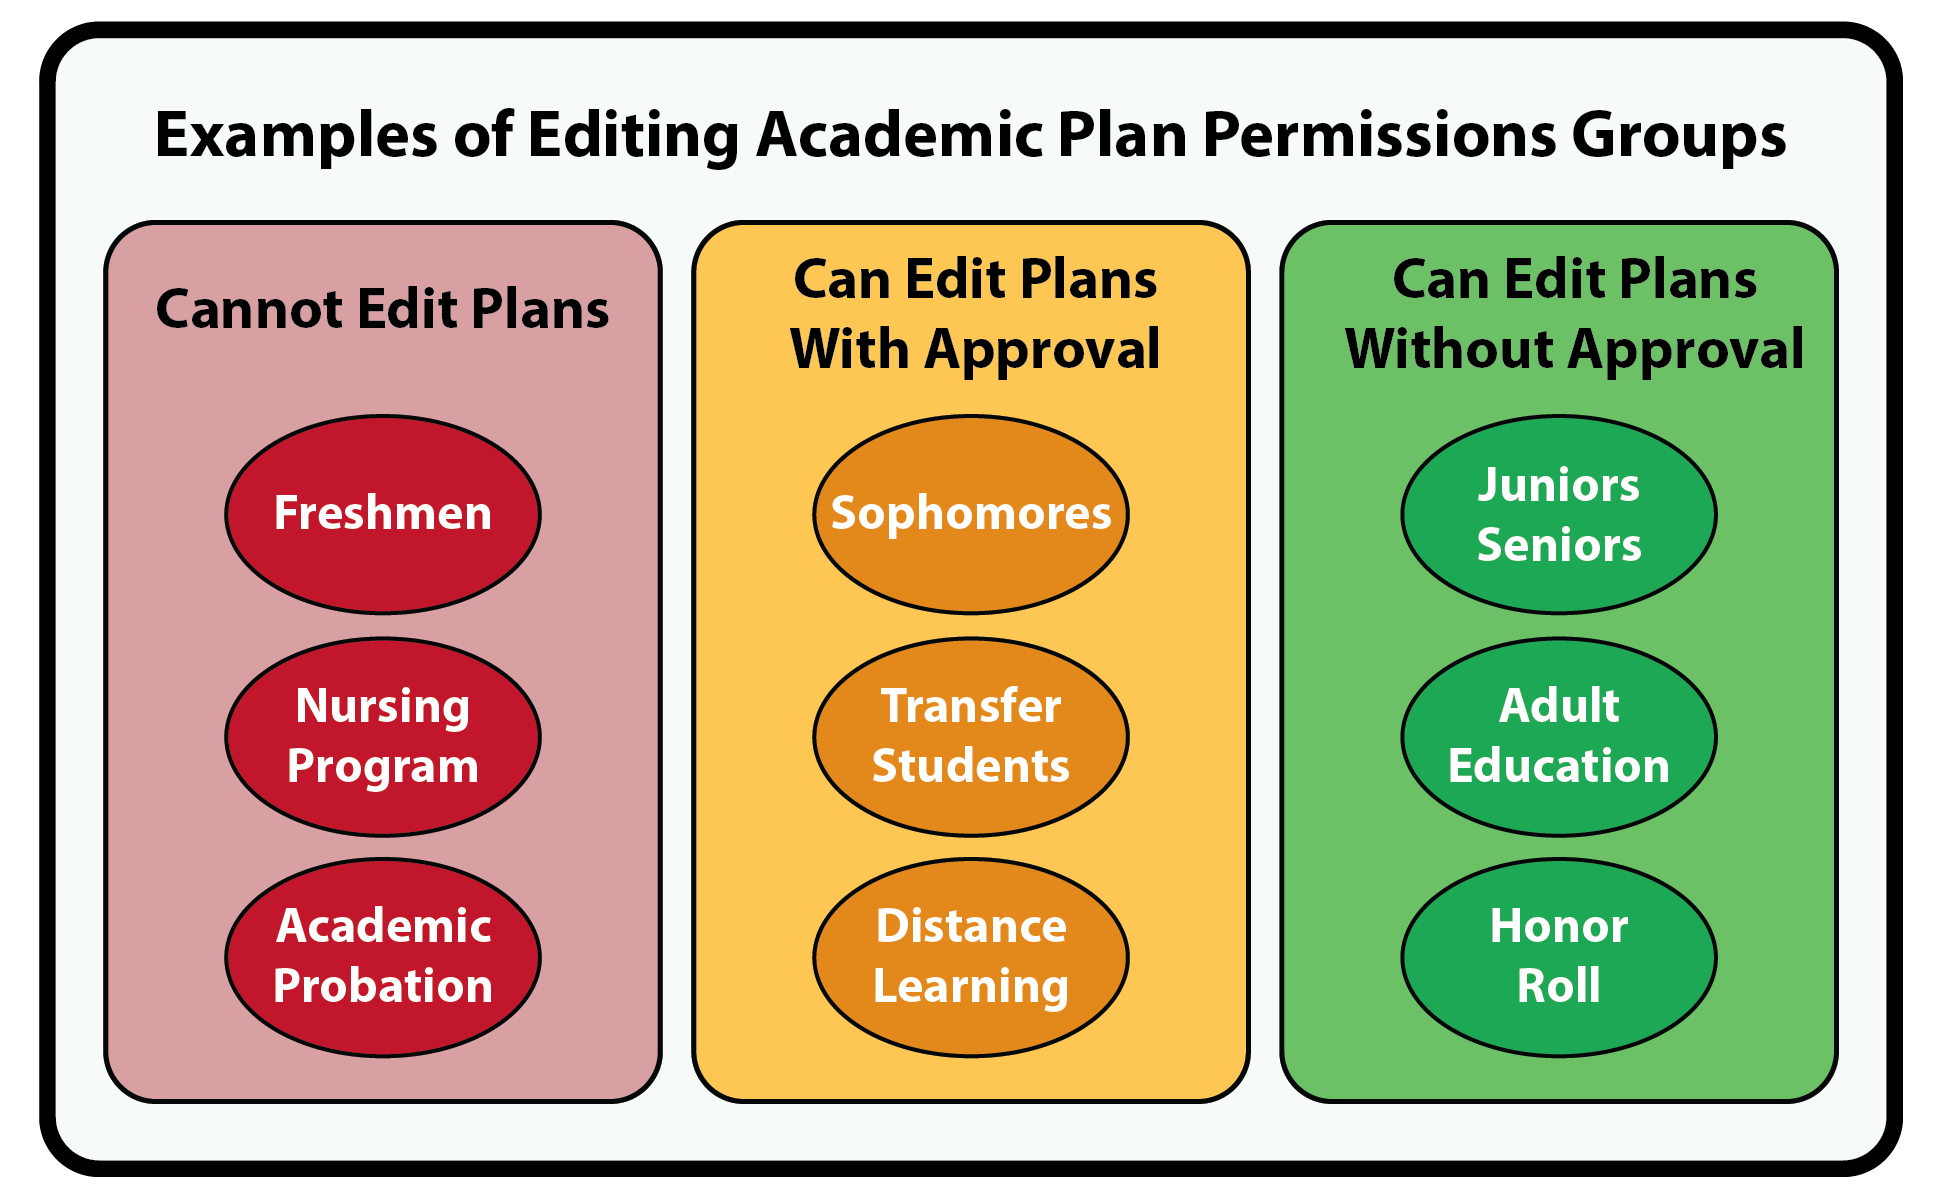
In the Approval Status column, choose one of the options:
Student cannot make changes - all changes to the student plan must be made by an advisor.
Student can make changes with approval - students can move requirements between terms, choose courses to take that meet requirements, and swap previously selected courses. When finished, the student must submit an approval request for the changes to take effect. The advisor will see notification that the student has submitted an approval request.
Student can make changes with approval - students can move requirements between terms, choose courses to take that meet requirements, and swap previously selected courses. No advisor approval is required for the changes to take effect.
Upon choosing an option, it becomes effective immediately. This means that if there are already approval requests waiting for advisor approval, and you switch to Student can make changes without approval, the requests are automatically approved and the advisor will no longer see them.
Notice
When configuring the permissions for My Academic Plan, there are almost limitless ways that permission groups can be set up. Use Web Registration Groups to group students as desired, then assign academic plan editing permissions to each group.
Web Registration Groups are defined in J1 Desktop | Web Registration Group Definition, students are added to a group using J1 Desktop | Student Information Window | Student Tab | Tel/Web, and then academic plan editing permissions are assigned in the My Academic Plan setup in J1 Web.
Note
If J1 Academic Planning has been set up and is being used, no additional setup is required in J1 Desktop for the My Academic Plan feature.
The following information must be complete and set up in J1 Desktop for the Student Academic Plan feature to display in the Campus Portal.

Requirements must be set up for each major with an academic plan (Institutional Requirement Trees window)
This includes assigning Advising Requirement Codes (ARC) to each course, associating the ARC with a requirement type, and adding requirements to aims.
Degrees must be cross-referenced with aims (Degree/Aim Cross Reference window)
Student must have the appropriate degree program assigned to them (Student Information window, Degree tab)
Confirm student workload limits are set on the Part-Time/Full-Time Definition window
Confirm the Allow Student Overload setting in the Web Registration Configuration window
It is your option whether or not students can go over upper limits, but this setting will affect what students may do while editing plans.
Warning
When changes to an academic plan are made in J1 Desktop, an advisor must review and re-publish the plan in J1 Web before these changes will be visible in Campus Portal.
Warning
The My Student Information feature must be displayed on a page (any page) before the My Academic Plan feature will be displayed. This is a known issue that will be fixed in a future release.
Log in as the Campus Portal administrator.
Access the page where you want add the My Academic Plan feature for students to access. (It defaults to the Student Home Page).
From the Admin Toolbar
 , click Options. The Options page appears.
Click Add a new feature to this page.
Click Features for Students to view a list of the student feature.
Click My Academic Plan. The Options page reappears.
Make any additional changes to the page name, layout or features on the page.
Click the Back to... link to return to the feature page.
Be sure to grant access and enable visibility to this feature for students.
When you choose to add the Student Academic Information feature as its own page, it will appear as a link on the sidebar for the currently selected tab.
Log in as the Campus Portal administrator.
From the left-hand side, click Add a Page. The Add a New Page block appears.
Click Features for Students to view a list of the student features.
Click My Academic Plan and the new page is created.
Be sure to grant access and set visibility to this page for students.
To use the Student Academic Information feature, students must be granted permission to access it.
Log in to Campus Portal as an administrator.
From the profile drop-down options, select Site Manager. The Site Manager page appears.
In the side menu, click the Global portlet operations. The Portlet page appears.
Select My Academic Plan feature from the list of portlets. The Global Operations for My Academic Plan appear.
Under the Student role, click the Allow Access button to move the toggle it to Yes. This will grant student access to the feature.
Click Save.
Click Exit to portal home to return to your home page.
Log in to the Campus Portal as an administrator and navigate to the appropriate feature page.
From the Admin Toolbar
, click Access. The Access page appears. Campus Portal roles that have access to that page are indicated by a green visible  symbol while roles that do not have access are indicated by the red hidden
  symbol.
Click on the Campus Portal role you are setting up permissions for. If the role has not already been granted access to the page, click the button to toggle it to Visible
 . Additional permissions appear.
To grant administrative privileges to a Campus Portal role, click the button for the Allow this role to manage this page permission to move the toggle to "Yes". Administrative permissions will allow the users in the role to add or remove features and set page and feature level permissions.
Changes are saved automatically
Student workload limits are set in Jenzabar Desktop, in the Part-Time/Full-Time Definition window. Also confirm the Allow Student Overload setting in the Web Registration Configuration window, also in J1 Desktop.
If some part of My Academic Plan isn't behaving the way you would expect, here are some things to check:
Is the Institutional Requirement Tree set up correctly and completely? (Institutional Requirement Tree window)
Does the student have the correct student division, academic degree, year, and major assigned? (Student Information window | Degree tab)
Are part-time and full-time upper limits set appropriately, for both the student division and term codes? (Part-Time/Full-Time Definition window)
Is the "Allow Student Overload" checkbox checked? (Web Registration Configuration window)
It is your option whether or not students can go over upper limits, but this setting will affect what students may do while editing plans.
Is the student assigned to the correct web registration group? (Student Information window | Student tab)

Is the My Student Information feature displayed on a page (any page)? The My Academic Plan feature will not be visible until the My Student Information feature exists on a page. This is a known issue that will be fixed in a future release.
Has the My Academic Plan feature been added to the Student Home Page? (You must be logged in as an Campus Portal Administrator)
Has access and visibility for My Academic Plan been turned on for appropriate students? (You must be logged in as an Campus Portal Administrator)

Does the advisor have the appropriate permissions set? (System Administration hub | Manage system users or Manage System Roles page)
Does the advisor need to review and republish the plan? (Advising Administration hub, Academic Plans Need Review page)
If there have been changes made to the plan in J1 Desktop, the advisor will need to republish in J1 Web.
Is Academic Planning set to On? Are the permissions configured correctly? (Advising Administration hub | Advising settings page)