Set Up a Student Housing Application for J1 Web Student Life
Important
Information and features vary according to the roles to which you belong and the permissions associated with those roles. For more information, contact your module manager or your campus support team.
Important
The housing application form template is only available for schools licensed to use J1 Web Student Life.
If your institution has a J1 Web Student Life license, you will be able to utilize the Jenzabar-provided housing application form template. The housing application form template automatically creates standard form tabs and questions relevant for the housing application. You can update, add, and remove tabs and questions as needed. The steps below outline the basic process of creating a housing application.
You must have a connection to the J1 database set up in FormFlow.
You must have the J1 Web API root connection set up in your Campus Portal's ERP settings.
Questions must retain the correct unique IDs. Removing a question or changing a question's unique ID can impact how these features work.
Follow these eight steps to set up the form from the template:
Select the form template.
Set the applicant Group ID.
Set start and end dates for accepting form applications.
Set access control for this form. (Optional)
Tip
This will ensure that only students in a particular applicant group for this session will be able to access this form. This step is not required, but is considered best practice to avoid allowing students to apply for housing (and possibly pay application fees) for sessions they are not a part of.
Set up payment profile. (Optional)
Edit the housing application fee in the form instructions.
Customize the form fields as needed.
Copy form URL into J1 Web.
Log in to the Campus Portal as an administrator and access FormFlow - Forms.
Click Manage Forms.
Click Add Form.
From the Choose a template drop-down, select housing application.
Click Create.
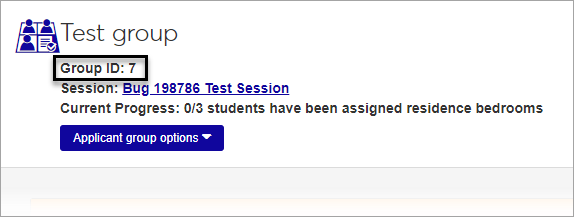
Log into J1 Web, locate the Applicant Group ID on the Applicant Group summary page, and write down the ID number.
Log in to Campus Portal and navigate to FormFlow - Forms.
Navigate to the housing application form you are working on.
On the Instruction page of the Housing Application, right-click the hidden field at the bottom of the form that reads "Right click here and replace the Default Value setting with the Group ID" and choose Properties.
Go to the Settings tab.
In the field labeled Default Value, replace default text with the Applicant Group ID that you copied from the Applicant Group summary page in J1 Web.
Click Save changes.
Access the Form Settings for your housing application.
Click on the Settings tab.
In the Display on field, enter the date and time that you first want this form to be available to students.
Note
The Display on date must be later than today's date. This will be validated in J1 Web, and you will not be able to publish the form if it is not later than today's date.
In the End on field, enter the date and time that you want this form to no longer be available to students.
Click Save settings.
Create the Access Control List for the group that should have access to the form.
From the FormFlow - Forms feature, click Manage Forms.
Click the Site Administrators link.
Click on Data Sources.
Click the plus icon next to the Data Source drop-down to add a new query.
Tip
Note that for the first time, you will create one from scratch. For future queries, it will be easier to copy and paste the Data Source query text from an existing Data source, and just modify the group ID.
In the Name field, type a name for your Access Control List.
Tip
Make sure it will let you know which applicant group ID it applies to (e.g., Housing Applicant Group 80).
In the Use Database field, select the appropriate database (e.g., J1 database).
Make sure that Is Access Control List is checked.
Type or paste the following into the Data Source Query field:
select distinct nm.ID_NUM from SAApplicantGroupStudent ags
join Person p on (ags.StudentPartyAppID = p.AppID)
join NAMEMASTER nm on (p.NameMasterAppID = nm.APPID) where ags.saapplicantgroupappid = 80
Change the underlined characters to the applicant group ID for the group that should have access to this form.
Limit access to the form to only the Access Control List that you created.
Open the housing application form.
From the main toolbar, click on Form Settings.
Click on the Access/Security tab.
In the Limit access to field, find and select the new access control list that you created in the step above.
Click Save settings.
Tip
You only need to set the payment profile if you would like to collect an application fee or deposit at the time of form submission. Either way, you will need to edit the text of the form to change the application fee amount, or remove the reference to the fee.
Open the housing application form.
Select the Application Fee & Finish page of the form.
Right-click on the "This housing application requires. . ." text field and select Properties.
In the Text field, enter the housing application fee amount where the text indicates to.
Click Save changes.
Tip
Editing this text field does not impact the settings in the payment profile for collecting application fees. You will need to edit this text to inform users of the fee amount, or you should remove the reference to the fee if this form will not have a fee associated with it.
Open the housing application form.
Review the form carefully, beginning on the first page, and remove any admin setup instructions that you don't want students to see.
Add or edit any form questions, and map fields appropriately.
From the FormFlow- Forms feature, click Manage Forms.
Open the housing application form.
From the main toolbar, click Form Settings.
On the Definition tab, copy the URL in the Direct Link field.
Log into J1 Web and navigate to the Residence Life Administration Hub.
Navigate to the summary page of the session.
To select an application group to work with, click on a published application group in the Housing Application block, or click the View all applicant groups link and click on the Group Name of an applicant group.
From the applicant group summary page, click the Review application process details link.
Click the edit icon next to the Process Step 1: Housing Application setting.
Paste the FormFlow form's Direct Link URL into the JICS FormFlow Form Link field.
Click Update.
Navigate back to the session summary page.
Repeat steps 7 - 11 for each of the applicant groups assigned to that session.