New Account Messaging
Important
Information and features vary according to the roles to which you belong and the permissions associated with those roles. For more information, contact your module manager or your campus support team.
You can configure this portlet to send JICS login and password information to users in JICS security groups. You can select the security group to receive the notification, create or update the template, and determine if the email notification is sent automatically or manually.
Notice
The New Account Messaging feature is used in conjunction with the Employee Position Management feature to send a new applicant a user account. New applicants can log in and view the positions for which they have applied and the application status. They can also apply for additional positions. You can develop the notification template, choose a delivery method, and determine which security groups will receive the notification.
Note
The Account Notification feature is shared by more than one CRM. All individuals assigned to JICS roles with access to the portlet can view the portlet and settings.
Setting Up the New Account Messaging Feature
Setup will need to be completed for the following.
Make sure each J1 Desktop user who needs to receive email notifications has an email address in the Name Entity window.
Open the Name Entity window.
In the ID # column, enter the ID number for the user whose email address you are verifying.
Note
To search for an ID number, choose Advanced Search from the right-click menu options.
Click the Search button. The user is displayed in the bottom panel of the window.
Set the Name Option radio button to Individual and the View radio button to Details.
On the Individual tab, verify or enter the user's email address in the Addresses group box.
If you have made updates, click the Save button.
Log in to the Campus Portal as an administrator and navigate to the appropriate feature page.
From the Admin Toolbar
 , click Access. The Access page appears. Campus Portal roles that have access to that page are indicated by a green visible
  symbol while roles that do not have access are indicated by the red hidden
  symbol.
Click on the Campus Portal role you are setting up permissions for. If the role has not already been granted access to the page, click the button to toggle it to Visible
 . Additional permissions appear.
To grant administrative privileges to a Campus Portal role, click the button for the Allow this role to manage this page permission to move the toggle to "Yes". Administrative permissions will allow the users in the role to add or remove features and set page and feature level permissions.
From the in New Account Messaging they can: section, use the toggle buttons set permissions.
To give this user role access to a global operation on the page, click on the No toggle button
 next to the global operation. The button toggles to Yes to indicate that the role now has that permission.
To remove this user role's access to a global operation on the page, click on the button next to the global operation. The button toggles to No to indicate that the role no longer has that permission.
Repeat for each permission option attached to the role.
Note
Changes are saved automatically.
Log in to JICS as an administrative user.
From the Portal menu on the left-hand side, click the desired portal.
From the Admin Toolbar menu, select Preferences.
On the Preferences page, select New Account Messaging from the drop-down options.
From the Active Account Sort Order drop-down list, select Last Name, First Name, or Email to determine how new accounts listed in the portlet will be sorted.
From the Held Account Sort Order drop-down list, select Last Name, First Name, or Email to determine how held accounts listed in the portlet will be sorted.
Click the Save Changes button. The updates are saved.
Log into JICS as an administrative user.
From the Portal menu on the left-hand side, click the desired portal.
From the New Account Messaging portlet, click Setup or the Setup is required before account notification will function properly link. The Setup screen appears.
From the Security Groups to Send Account Notifications to drop-down list, select the security group to receive the notification.
Note
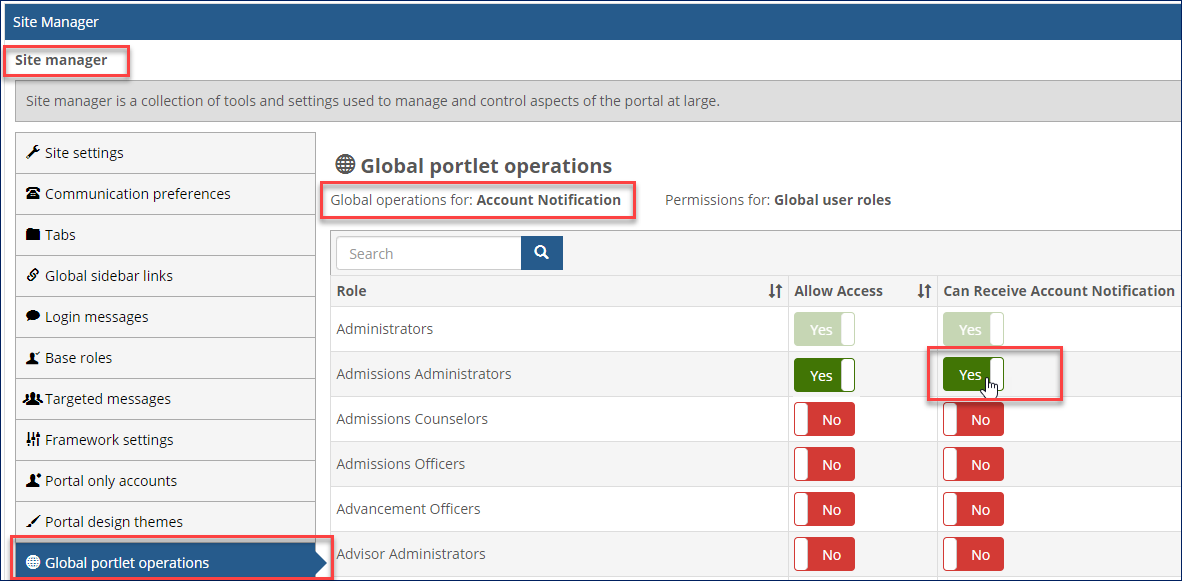
To select groups that will be informed by email when accounts are created, go to Site Manager > Global Portlet Operations > Account Notification. For each group you wish, ensure the Can Receive Account Notification option is set to Yes.
Tip
Potential applicants will not belong to a security group. To allow applicants to receive a notification, select Everyone.
From the Default Email Template for Account Notifications drop-down list, select the email template to be used, or create a new template.
To create a new email template:
Click the Add icon
 . The Email Template page appears.
In the Template Name column, enter a descriptive name for the template
In the From column, enter the email address of the individual responsible for receiving direct email messages about the email sent.
Note
This email address must have the same domain as the SMTP server sending the email. For example, if your SMTP server's domain is university.net, the 'from' address must be like name@university.net.
To copy or blind copy additional stakeholders such as the Module Manager, enter their email addresses in the CC or BCC columns.
In the Subject column, enter the subject to be used for the email. This subject is used each time the notification is sent.
In the Message column, enter the message to be sent with the email. This text is used each time the email is sent. To include automatically updated related information, enter the following:
@@FirstName
@@LastName
@@MiddleName
@@Email
@@UserLogin
@@ResetLink
@@Major
Determine the email format by selecting Text or HTML
In the Send Test Email To column, enter an email address to which you want to send a test email.
Click the Send button.
Click the Save button. The template is saved and the Setup page reappears.
To update an existing email template:
Click the Edit icon
 . The Email Template page appears.
Make the appropriate updates.
In the Send Test Email To column, enter an email address to which you want to send a test email.
Click the Send button.
Click the Save button. The template is saved and the Setup page reappears.
From the Account Notification Delivery Method drop-down:
Select Manual Email Notification if you want the account notifications to accumulate so they can be reviewed and sent at a designated time.
Select Automatic Email Notification if you want account notification emails to be sent immediately as users are added to a security group.
Click the Save button.
You can also create new or edit existing email templates that will be used by the New Account Messaging portlet. These templates should include the Template Name, From email address, Subject, and Body of the email message and can be customized to include the user's name, major, login, and password. The CC and BCC email addresses can be configured if desired.
Note
The options to create or modify email templates are available if Modify Email Template and/or Create Email Template checkboxes were selected as operations for the security group.
Click the Add icon
. The Email Template page appears.In the Template Name column, enter a descriptive name for the template.
In the From column, enter the email address of the individual responsible for receiving direct email messages about the email sent.
Note
This email address must have the same domain as the SMTP server sending the email. For example, if your SMTP server's domain is university.net, the 'from' address must be name@university.net.
To copy or blind copy additional stakeholders such as the Module Manager, enter their email addresses in the CC or BCC columns.
In the Message column, enter the message to be sent with the email. This text is used each time the email is sent. To include automatically updated related information, enter the following:
@@FirstName
@@LastName
@@MiddleName
@@Email
@@UserLogin
@@ResetLink
@@Major
Determine the email format by selecting Text or HTML.
In the Send Test Email To column, enter an email address to which you want to send a test email.
Click the Send button.
Click the Save button. The template is saved and the Setup page reappears.
Click the Edit icon
.Make the appropriate updates.
In the Send Test Email To column, enter an email address to which you want to send a test email message.
Click the Send button.
Click the Save button. The template is saved, and the Setup page reappears.