My Student Information
The My Student Information feature (formerly the My Account Info feature) allows Students to view their current balance as well as a list of all prior transactions on their account. Also, a parent/other person may be able to view a student's account information if that student grants appropriate permissions.
Note
Account information cannot be viewed while the Business Office runs a recalculation (recalc) on the system.
This feature is composed of two parts: My Account Balances and Course and Fee Statement.
My Account Balances
My Account Balances displays the current amount due, your full Accounts Receivable balance as reported from your school's business office. The balance for each account is a link that opens the View Transactions screen.
The View Transactions screen displays detailed information on each transaction (posted and/or preliminary/unposted transactions) applied to your account. The Transaction Description, Transaction Date, Transaction Amount, and any relevant notes are displayed for each account. The account balance is shown at the bottom of each section unless a payment plan is associated with the account, in which case a message indicating such will appear.
Tip
Transactions that are displayed are dependent on the settings in the Setup menu.
The Make a Payment link opens the Pay on My Account screen.
The Pay on My Account screen displays each account and account balance, along with an Amount to Pay field for you to enter the amount of your payment.
Course and Fee Statement
Course and Fee Statement generates a printable statements in .pdf format. This statement may not include all transactions to date and may not be the same balance as is displayed on My Account Balances.
The Generate my Course and Fee Statement link opens the Course and Fee Statement screen. This statement may not include all transactions to date and may result in a different ending balance than you see on My Account Balances. The Generate my Course and Fee Statement link generates a printable statement in PDF format. Please check with the Business Office for additional details.
The View my Course and Fee Statement link allows you to view and print the statement. Click the PDF
 icon to print a copy.
The Pay Must Pay Courses link can be used if you have Must Pay Courses that have not been paid. Once the Must Pay Course fees are paid, the registration status changes from 'R' (Reserved) to 'C' (Current).
From the My Students feature, click the appropriate student name link.
On the student's screen, click the Student Account Information link.
On the My Student Information screen, click the My Account Balances link to retrieve account information.
Balances for all accounts are displayed on the My Account Balances screen.
To view transaction details of each account, click the amount link.
To view the Payment Plan, click the View Payment Plan link and then position to the account for which you want to view the payment plan.
To make a payment, click the Make a Payment link. On the Pay on My Account screen, enter the amount you want to pay against each account, and then click Submit.
To view the Course and Fee Statement, click the Course and Fee Statement link and then click the Generate my Course and Fee Statement link on the Course and Fee Statement screen. You can view and/or print the statement.
From the My Students feature, click the appropriate student name link.
On the student's screen, click the Student Account Information link.
On the My Student Information screen, click the Course and Fee Statement link.
On the Course and Fee Statement screen:
a. Click the Generate my Course and Fee Statement link to generate the report.
b. Click the View my Course and Fee Statement link to view the statement.
c. Click the PDF
icon to print the statement.
From the My Students feature, click the appropriate student name link.
On the student's screen, click the Student Account Information link.
On the My Student Information screen, click the My Account Balances link to retrieve account information.
Balances for all accounts are displayed on the My Account Balances screen.
To make a payment, click the Make a Payment link.
Note
You will be able to make a payment online only if your school has the online payment feature set up. If you do not see a Make payment button, you will need to contact your school’s business office to make any payments on your plan.
Making a payment online is quick and easy. Throughout the Campus portal you may see the green Make Payment buttons. When you click the button, you will be able to enter the amount you want to pay and continue to enter your credit card information.
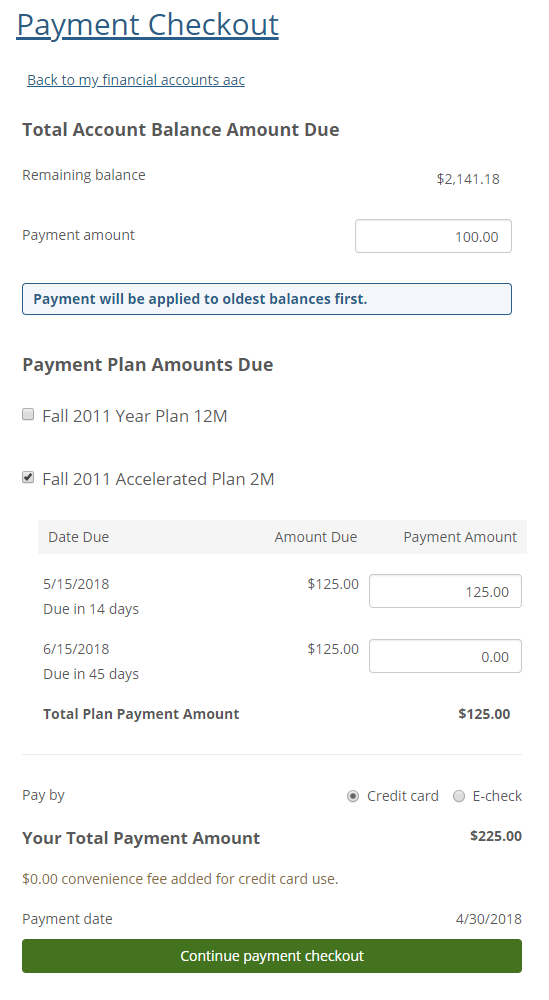
From the Payment Checkout window, you will see the total account balance at the top. For quick payment, you can enter the amount you want to pay in the Payment Amount field then click the Continue payment checkout button at the bottom.
Tip
Any payment made on the total balance will automatically apply to the oldest balance first.
If you have a payment plan, you will see the Payment Plan Amount Due section (just below the Total Account Balance Amounts Due section). You will see a list of due dates and amounts, and can make a payment directly on a due date. If you make a payment for more than the due amount, any additional amount will automatically be applied to the oldest balance first.
If you have more than one payment plan, you can select the checkbox next to the plan title to open a list of due dates and amounts. You can pay on multiple plans by entering an amount next to the due dates. You will see a total amount at the bottom of the window.
Warning
Payment Amounts entered on the Total Balance and Payment Plans sections are cumulative. If you put an amount in the Total Account Balance Amount Due section and put an amount in the Payment Plan Amounts Due section, you will be paying the total of those amounts.
Be sure to check your final total at the bottom of the page before clicking Continue payment checkout.
 |
From the Payment Checkout page, enter your Credit Card information and click Pay Now.
Note
On the Payment Form, you will see the standard payment fields which your school requires for making the payment online.
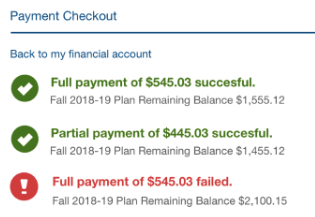
Once you have completed the payment you will see the Payment Receipt page, and if you go back to the Campus Portal tab, you will see a list of the payments made.
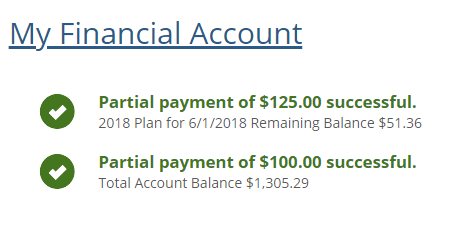
Tip
If a payment was not successful, you will see the payment listed in red with a payment failed message.
From the My Students feature, click the appropriate student name link.
On the student's screen, click the Student Account Information link.
On the My Account Info screen, click the My Account Balances link to retrieve account information.
Balances for all accounts are displayed on the My Account Balances screen.
Click the amount link to view transaction details for each account.
From the My Students feature, click the appropriate student name link.
On the student's screen, click the Student Account Information link.
On the My Student Information screen, click the My Account Balances link to retrieve account information.
Balances for all accounts are displayed on the My Account Balances screen.
To view the Payment Plan, click the View Payment Plan link and then position to the account for which you want to view the payment plan.