Working with Custom Tables
A pre-defined set of model J1 Desktop tables are automatically available for mapping from within Form Builder. However, you can also manually make a custom table available for mapping.
Note
You cannot make additional J1 Desktop model database tables available for mapping.
Tip
You should avoid naming custom columns that will be mapped to Form Builder forms so that it ends in "PHONE" if it will not actually be a phone number column. Jenzabar strips out characters for all mapping columns that end in "PHONE" because Jenzabar assumes it is a phone that is stored numerically in the J1 database and therefore cannot handle characters but only digits.
Open J1 Desktop
Navigate to the Manage Mapping Tables window.
In the Custom Tables portion of the window, click Add Table. The Add Custom Table window is displayed.
In the New Custom Table field, enter the name of the table you want to make available. This name will be displayed within Form Builder to people designing forms.
In the Display Name field, enter a descriptive name of the table. This name will be displayed within Form Builder to people designing forms.
Press the Tab key to activate additional buttons.
Click Add Table and Assign Submission Types.
A dialog box appears and displays the following text even if you have not recently altered this particular table: “New columns have been added to this table.” Click OK. The Assign Submission Types window is displayed.
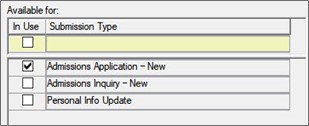
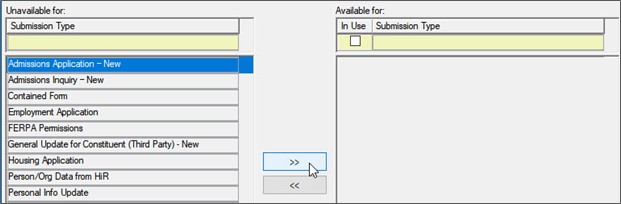
In the Unavailable for: column, select the submission type(s) for which to make the custom table available for mapping.
Click the button with the arrow pointing to the column on the right (>>).
The value(s) you chose are now displayed in the Available for: column.
Click Save.
Click Close. The Manage Mapping Tables window is again displayed listing each column defined in the custom table.
Make any changes that are necessary and Save.
Tip
You cannot alter the Is Available to Pre-populate value (this value cannot be selected for any custom tables). However, you can alter the Allow Blank to Override DB value as desired.
Note
At this point, your custom table would appear to be available within Form Builder for the type of form(s) you chose in Step 10 as soon as you cleared the JICS cache; however, you still would not be able to actually map questions to this table until making specific columns available for mapping, as described in the next few steps.
Navigate to the Internet Submissions window.
In the Submission Type column, select the value or one of the values that you chose in Step 10.
Click Review Mapping Details. The Review Submission Mapping Details window is displayed.
In the Available Tables field, select the custom table that you want to make available for mapping.
The system updates the Data Mapping area of the window with details about the columns defined for the selected table.
In the Is Available for Mapping column, select each column that you want to be available for mapping within Form Builder. Alternatively, select the Select All checkbox above the Is Available for Mapping column to mark all columns as available for mapping.
If appropriate, use the Table Notes field to enter additional details about the purpose of this table. This text will be displayed within JICS to users designing forms.
If appropriate, alter the value in the Nullable column.
If you want the system to insert a default value for any custom data that is mapped to this column or for any Donor Profiles form when the user is creating a new row of data for a specific data category, enter that value in the Default Value text box.
Click Save.
Click Close.
If you chose more than one form type in Step 10, repeat Steps 15-21 for each form type that you chose. Repeat this process until all of the appropriate form types have been configured.
Clear the JICS cache.
If you have made a custom table available for mapping and you no longer want it to be available, you can reconfigure the system so that the table is no longer displayed within Form Builder to users engaged in mapping questions to the database.
Note
If you make a custom table unavailable for mapping, any previous mappings that you set up in Form Builder using this table will still be valid, although details about the mapping will no longer be displayed to someone working in Form Builder. Therefore, before attempting to make a custom table unavailable, you should make sure that there are no forms that currently map to the table.
Open J1 Desktop
Navigate to the Manage Mapping Tables window.
In the Available Tables drop-down menu, select the custom table that you want to make unavailable.
The system updates the Mapping Columns area of the window with information about the table you selected.
Click Assign Submission Types. The Assign Submission Types window is displayed.
In the Available For: column, select the submission type(s) you wish to no longer use the selected custom table.
Note
Refer to the In Use checkbox to make sure that the table can be made unavailable by this method. If the checkbox is selected, that means a user submitted a form while it was mapped to this table. In this case, the table cannot be made unavailable using this window, although the individual mapping columns can be marked as unavailable.
Click the button that points to the left (<<).
Click Save.
Close the Assign Submission Types window.
If you no longer want this custom table to appear in the Available Tables drop-down menu, select the table in the list and click Delete Table.
Note
This option is only available if the table has not been referenced by a submitted form.
Close the Manage Mapping Tables window.
Clear the JICS cache.