Student Registration
Use this feature to set up your schedule and register for courses. The search and the planning calendar help you find the courses you need and see your schedule at a glance. You can also request clearances, and you can address any holds on your registration.
Your registration experience can vary depending on whether you have an academic plan, a degree audit, or neither.
If you have an academic plan, the feature guides you to courses that fit the plan. You can click on a course or a group to find available sections.
Your academic plan helps to keep you on track each term to complete requirements for your program, certification, or degree.
Depending on your school's policies, you might be restricted to registering only for courses on your plan for this term. The level of restriction you have is called "plan sensitivity." The message with the information icon shows your plan sensitivity. Ask your advisor if you have questions about your restrictions.
If you don't have a plan but have a degree audit, it guides you toward completing your degree. You can click a requirement to see courses in that category that you've completed and the ones you need. Click on needed courses to find available sections. You can hide completed courses.
Your degree audit shows the status of your degree requirements.
If you have neither academic plan nor degree audit, you use the simple course search.
Planning involves placing courses on your planning calendar. There you can see schedule conflicts, holds, and potential issues before registering. You can see which courses fit your requirements, how many seats are available, and who the instructors are. You can also view course locations on a map, and clear up any issues before you register. Place and remove courses freely until you're ready to register them. Your school may open planning before the registration period opens. When you're ready and when registration is open, you can register for any or all of the courses on your planning calendar.
Tip
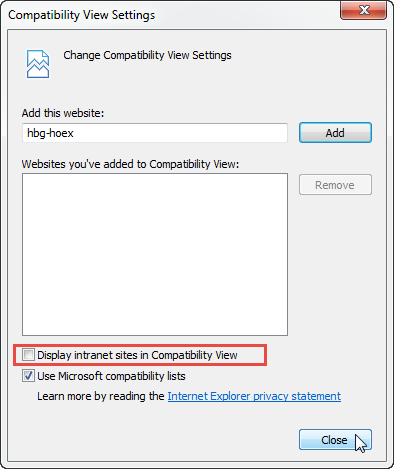
If you use Internet Explorer, make sure Compatibility View is turned off.
Find Courses
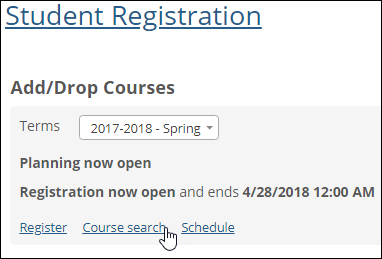
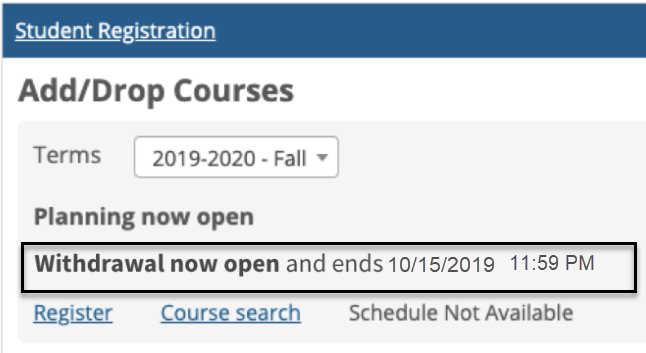
When you select a term, the Student Registration feature shows you when planning and registration are available. (Your school may have a planning period before registration opens. You can create a schedule and have it ready when registration opens.) When you click Plan or Register, the search panel and planning calendar appear. Find courses by clicking requirements or running a course search.
Tip
The Course Search panel can appear in several places. In the course search, you can search by any combination of fields.
When neither Planning nor Registration is open, you can use the Course Search link on the Student Registration landing page. It's a view-only search, so you can't place them on your calendar from there, but you can gather information.
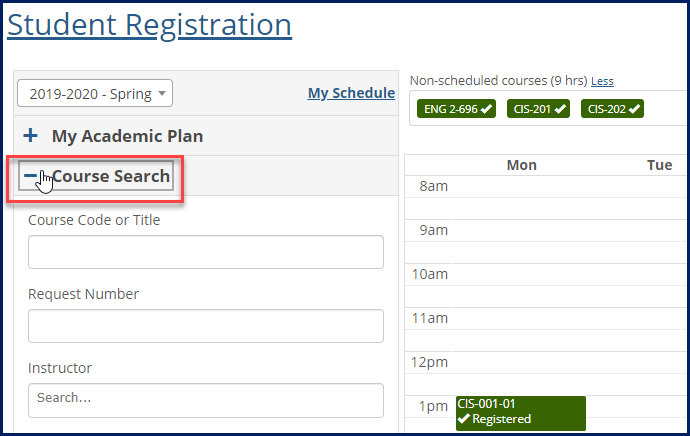
When Planning or Registration is open, use the Course Search option in the left panel of the My Schedule page.
From the Student Registration feature, click the Plan or Register link.
The search panel and planning calendar appear.
Select a term if a choice is available.
Scroll through the left panel to see your requirements, or, if available, run a course search. The requirements may be individual courses or broad categories.
Click requirements and courses to find a section.
On a section, click the ellipsis.
Click View Section Details.
More details appear including the course description and location. From here you can:
View the location on a Google map.
Email the instructor.
Add the section to your planning calendar.
Close the pop-up.
In either Course Search, select a term if a choice is available.
Use any combination of the search fields, and then click the Search Courses button. Course sections appear that match your search phrases.
Important
To find all course sections that are taught online, click the Meeting Type drop-down, and select Online.
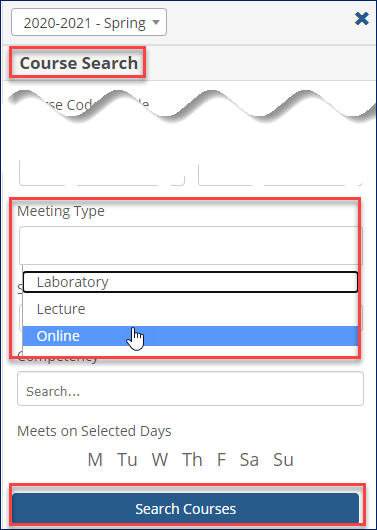
All online sections appear in the results.

If your academic plan allows it, you can search for courses that are in your plan but are planned for future terms. For example, if you're a sophomore, and your plan includes Botany 301 in your senior year, you may be able to take it now instead of waiting till your senior year.
Warning
If you register this term for a course that was planned for a future term, be sure to contact your advisor to adjust your plan.
Scroll down and click Future Requirements. Requirements and courses scheduled for future terms in your academic plan appear.
Note
If your plan doesn't allow you to register for future requirements, you won't see this.
Select courses to add to your calendar.
Develop Your Schedule
Once you find a section, you can view details, contact the instructor, or add it to your schedule. Adding it to your schedule doesn't register you; it just places the course on your calendar to help you plan.
Work out your schedule by adding courses to your calendar, experimenting with various sections, until you find the combination that meets your requirements. During this process, you can register for some courses, request approvals and permissions for others, and keep others on your calendar without registering. Your calendar may include conflicts and warnings while you're in the planning stages.
Note
Your calendar saves automatically and will still be there next time you log in.
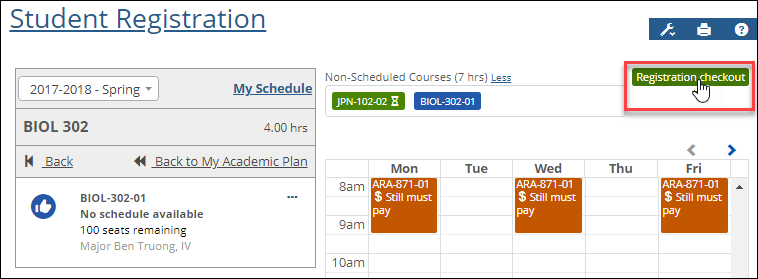
Non-Scheduled Courses
Some courses don't have a regular schedule, so they can't be placed on your calendar. Examples may include directed study, online courses, or courses whose schedules are not determined yet.
Nonscheduled courses appear in the search panel with the message "No schedule available" or "No schedule." When you add them to your schedule, they appear just above the calendar. The subtotal of hours for nonscheduled courses alone shows just above the courses. You can hide nonscheduled courses by clicking the Less link, and show the courses again by clicking the More link.

Tip
Nonscheduled courses use the same colors and symbols as courses on the calendar, and they work just like scheduled courses for approvals, registration checkout, removing from the schedule, and dropping.
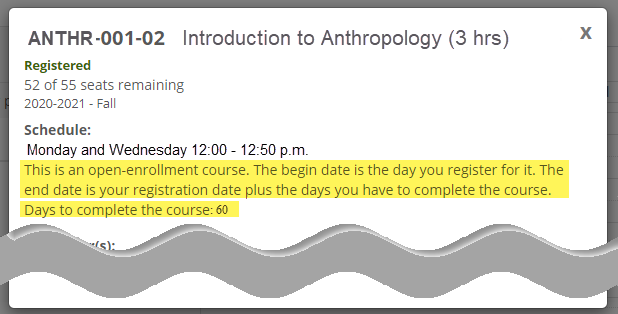
Open Enrollment Sections
If your school uses Open Enrollment, you may be able to register for a section outside the usual registration period or even take a section outside of the usual term period. Open enrollment sections are labeled in the My Schedule view of the Student Registration page in the Course Search, and on the planning calendar.
You can view course details to see how long you have to complete the course.
Follow the steps to find courses.
Once you've found a section, click the Add
 icon , or click the ellipsis then click Add to my schedule.
Follow the steps to find a course section.
Click View section details.
Click View on map.
Click a course on your calendar. A pop-up window with course options will appear.
Click Clear from calendar.
Note
Depending on the status of the course on the calendar, this context menu might say any of these:
Clear from calendar (for a course merely placed on the calendar)
Drop course (for a registered course)
Cancel approval request (for a course awaiting approval)
Remove from waitlist (if you're on the waitlist for the course)
Resolve Issues (Clearance & Approvals)
Before you register, you can see whether any of your courses have issues to address. Then you can contact instructors and initiate advisor approvals and registration clearance.
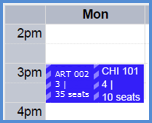
Edge stripes on a course on your calendar alert you to issues you need to address before registering. The issues might concern the number seats available, permissions or approvals required, or prerequisites, for example. A solid red stripe indicates an error that will prevent you from registering the course. Amber striping indicates an issue that won't block registration.
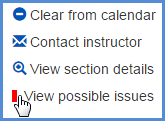
Click the course.
Select View possible issues. The Possible Issues window opens to advise you.

To see all the issues with all the courses on your calendar, click the Registration Checkout button. (If you haven't yet been cleared to register, click the Check Registration Status button that appears instead.)
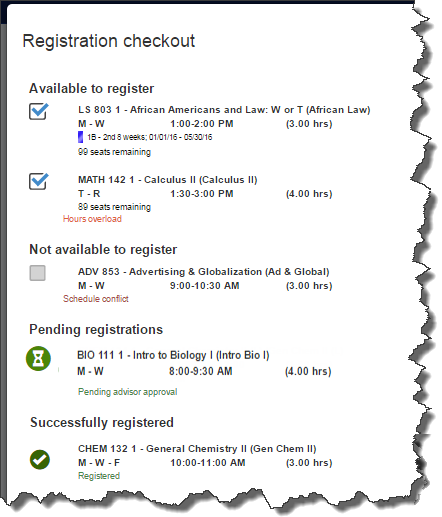
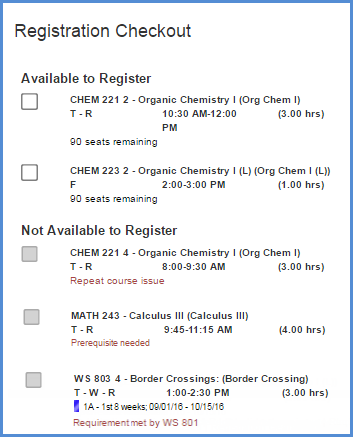
On the Registration checkout screen, all the courses from your calendar are arranged according to their status. Take care of any issues holding up your registration. If a course requires advisor approval, you can contact your advisor from here or submit a request for approval.
If you have a must-pay course on your calendar, click the Pay now button. The Must-Pay Courses pop-up opens showing all your must-pay courses.
Select the courses you want to pay for now.
Click the Pay now button.
Follow the prompts on the payment windows, and enter required information.
Click the Submit button. A message tells you whether your payment was successful.
The course now shows as Registered on your planning calendar.
Click the course.
From the pop-up that appears, click Contact instructor. An email window opens already addressed to the instructor.
Click a requirement or course until you see a course section.
Click the ellipsis.
From the drop-down list that appears, click Contact instructor. An email window opens already addressed to the instructor.
If you're required to get clearance to register, a red stripe appears on your courses. (The red stripe could also indicate some other condition such as a schedule conflict.)
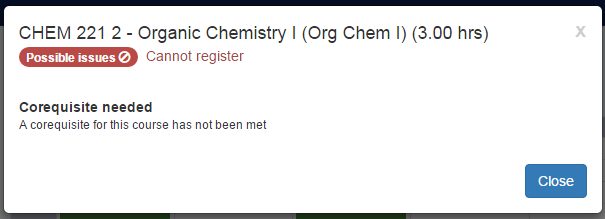
Click View possible issues. The pop-up window tells you whether you need clearance.
To request registration clearance:
Click Check registration status. The Registration checkout pop-up appears.
Click the Contact drop-down. Your advisor's contact information appears.
Click the email option to open a message addressed to your advisor in your email application.
Register
When registration opens, you can register for any or all of the courses on your calendar that aren't awaiting approval. When you're ready to register for one or more courses, click the Registration Checkout button to open the Registration Checkout pop-up.
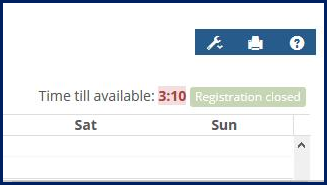
If registration isn't open yet, the button is inactive, and it's labeled Registration closed. At 5 minutes before registration opens, a countdown timer appears.
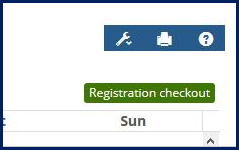
As soon as registration opens, the button label changes to Registration checkout. That's when you can click it to open the Registration Checkout page and complete your registration.
Select a course on your calendar (or in the Non-Scheduled Courses just above your calendar).
Click Registration checkout. The Registration Checkout screen opens.
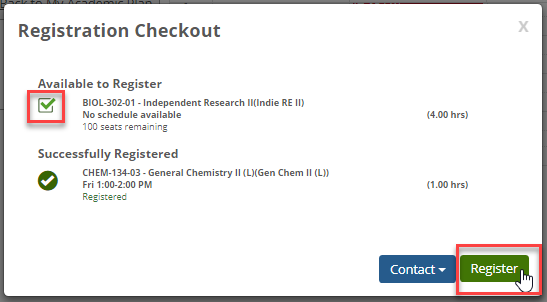
Select any courses that are available to register.
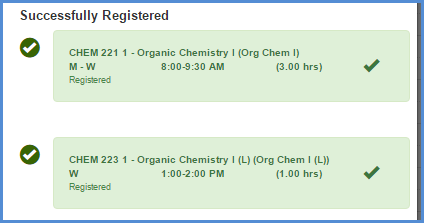
Click Register. A pop-up message tells you whether your registration was successful. Successfully registered courses appear green on your calendar and are labeled 'Registered'.
If a course wasn't registered, and you don't know how to proceed, contact your advisor or the registration office.
You can request registration in a section that's already full. You simply attempt to register for the section, and you're put on the waitlist. The section shows on your calendar with the label 'Waitlisted'.
Note
If you're waitlisted in a course, it doesn't count toward your repeated-course total.
You then ask the instructor to create an override to let you into the section. If the instructor overrides the course-full restriction, you can move your section status from 'Waitlisted' status to 'Registered'.
Tip
The instructor is not automatically notified that you want to register and may not know that the section is already full. Contact the instructor, and ask if they can create a course-full override so you can register.
Keep checking the status of the section on your calendar. If it's no longer full or if the instructor grants you a course-full override, then when you click the course, the 'Move to registered' option is available in the drop-down. Click it to register for the section.
Place the already-full section on your calendar. It appears with an edge stripe and says 'Full'.
Click the Registration checkout button.
On the Registration Checkout pop-up, select the section.
Click Contact, and select Send [instructor's name] an email.
Include this information in your email:
Your name
The section as it appears on your calendar (such as ANTHR-301-01)
Ask the instructor to create a course-full override for you.
The instructor can find instructions here: J1 Web Faculty: Course Overrides
Click the Register button. If your registration also requires other approvals, the label may be something like Request advisor approval.
The section on your calendar shows as 'Waitlisted'.
Your school may be set up to notify you automatically by email if your override is granted. If you school isn't set up for automatic notification of overrides, keep checking your calendar. Click the section. If 'Move to registered is an option in the drop-down, then the override was granted (or the section is no longer full).
If you're not approved, find another section.
If you're approved, click the section on your calendar.
In the drop-down, click the Move to registered option. You're moving the section's status from 'Waitlisted' to 'Registered'.
The section tile turns green and says 'Registered'.
Click a registered course on your calendar.
From the drop-down list that appears, click Drop course.
A pop-up message confirms the drop, and the course is removed from your calendar.
Note
Open Enrollment courses may have a their own particular drop period.
Tip
Dropped courses aren't counted as repeats, so they don't add to your count of repeated courses.
After the drop period ends, your school may allow a period of time to withdraw from a course. Unlike a dropped course, a withdrawn course appears on your transcript.
The Student Registration feature shows when the withdrawal period is open.
Click the course on your calendar.
Select 'Withdraw from course'.
On the Withdraw from Course pop-up, click the Withdraw button.
A message tells you whether the withdrawal was successful. If it was, the course shows as withdrawn on your calendar.
Note
Open Enrollment courses may have their own particular withdrawal period.
Tip
You may not be allowed to withdraw from all courses in a term. If you need to do that, contact your advisor or the registration office.
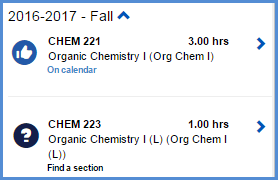
If a course has corequisites, register for the course and its corequisites together.
Place the course and its corequisites on your calendar.
Click the Registration checkout button.
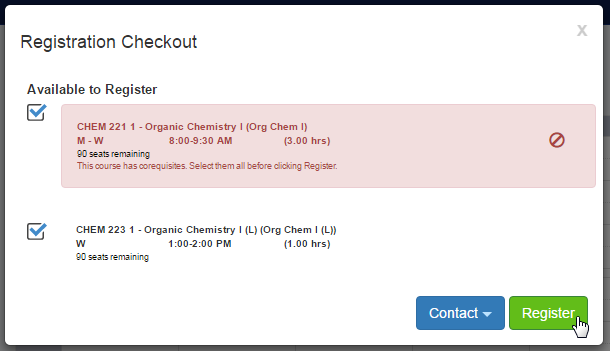
On the Registration Checkout screen, select the course and its corequisites and then click the Register button.
When you try to drop a course that has corequisites, you're prompted to either drop all the corequisites at once or choose a replacement section for the course you're dropping. To drop the courses:
Click the course on your calendar.
Click Drop course. A warning message opens.
Click the Yes radio button.
Click Drop.
A message asks if you want to drop the corequisite, too. Click the Yes radio button, and click Drop.
Both courses are dropped and removed from your calendar.
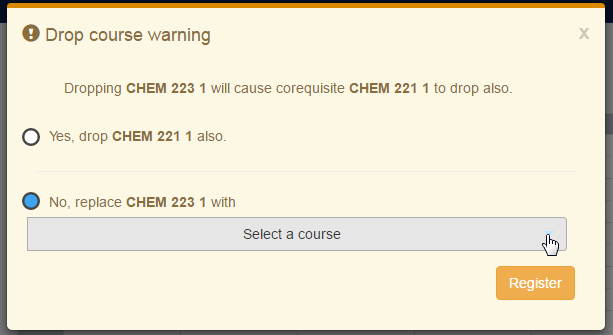
Usually, to switch sections of a course, you simply drop the course and add a new section of it. But a course with corequisites is different because corequisites must be dropped together. If you only want to switch sections of one of the corequisites, you can do it without actually dropping the courses.
On your calendar, click the course you want to switch.
Click Drop course. A warning message opens.
Click the No radio button.
Use the Select a course drop-down to select a replacement section.
Click Register.
Notice
Let's say, you want to change sections of your chemistry lab. Click the lab on your calendar and click Drop course. A warning message asks whether you want to drop both the lab and its corequisite. But you want to replace your lab with a different section, so you select a new section from the Select a Course drop-down. Then click Register.
 |
After a course is registered or pending registration, you can access your schedule from the My Schedule page. You can get to your schedule from the landing page or from the Registration view.
If the feature doesn't seem to work for you at all, contact the registration office to explain your situation. Ask them to check that your registration group (also called a tel/web group) is set up for this term or subterm.
The Registrar's office determines when a term is available in the Student Registration feature.
Yes. Even when neither Planning nor Registration is open, you can search courses from the Student Registration page. Click the Course search link. It's a view-only search, so you can't place them on your calendar from there, but you can gather information.
A registration administrator selects the fields available for course searches. Contact the registrar's office for guidance.
Depending on your school's policies, you might be restricted to registering only for courses on your academic plan for this term. The level of restriction you have is called "plan sensitivity." You can see your level just under the My Academic Plan heading.
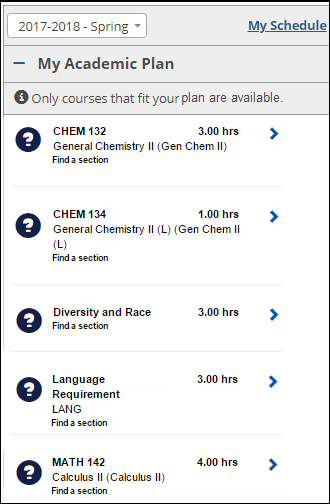
Click the Info  icon for a description of your plan sensitivity. Ask your advisor if you have questions about your restrictions.
Level | Description | Info Pop-Up | Courses you can see |
|---|---|---|---|
Most restrictive | Only courses on this term's plan are available. | Select courses on your academic plan for this term. This will help you successfully complete your degree program. | Courses on your plan for the selected term. To see other courses, return to the Add/Drop Courses feature, and click View Courses. You'll be able to search for all courses, but you won't be able to add any from there. |
Moderately restrictive | Only courses on your plan are available. | Select courses on your academic plan. If you register for courses planned for a future term, be sure to update your plan with your advisor. |
|
Least restrictive | Courses on and off your plan are available. | You can select any courses, but you are responsible to make sure you meet the requirements of your academic plan. |
|
Colors
Colors on your calendar are applied to help you quickly identify the status of a course.
Color | Meaning | Example | |
|---|---|---|---|
Blue | a course on the calendar but not registered |
| |
Light Blue | a waitlisted course |
| |
Green | a registered course |
| |
Light Green | a course pending approval |
| |
Amber | a course requiring payment |
| |
Red | registration denied |
|


Edge Stripes and Colors
Edge striping indicates a special condition concerning a course. Colors and stripes are used together to help you quickly identify what you need to do for a course. Click the course and select View section details.
Striping | Meaning | Example | |||
|---|---|---|---|---|---|
Same Color as the Course | a course in a subterm |
| |||
Amber and White | a course with a warning TipTo see the begin and end dates of a course in a subterm, click the course on your calendar and select View section details. |
| |||
Solid Red | a course with an error such as:
|
|


If the subterm dates don't overlap, you can have courses from different subterms in the same time slot. On your calendar, they'll appear with blue edge striping to remind you that they're subterm courses and not necessarily in conflict.
 |
It may be disabled for a number of reasons including these:
The registration period is not open yet. (The button label is "Registration closed".)
There are no unregistered courses on your calendar.
You need registration clearance.
No. The Registration checkout button is disabled (and labeled "Registration closed") until the registration period opens. Five minutes before the registration period opens, a countdown timer appears next to the disabled button, so you can be ready the moment the period opens.
Click the button once to open the Registration Checkout screen.
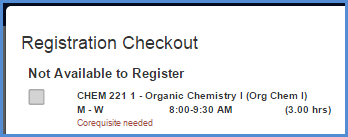
On the registration checkout screen, some courses may be listed under the heading Not Available to Register. The checkboxes for those courses are disabled. The reasons are listed. Examples include schedule conflicts, required prerequisites or corequisites, and repeated courses or courses that fulfill the same requirement as another course on your calendar.
 |
There are several possibilities.
The course search on the Student Registration landing page is view only. You can't add courses to your schedule from it.
From other locations, if you can't add a course, it may be because it's not on your academic plan or doesn't meet your degree requirements.
The course might not be allowed in your division.
There could be a number of reasons. The withdrawal period may not be open. Withdrawal may not be allowed for this course or term or subterm or for the registration group you're in. Or it may be the last course in your term or subterm. Ask your advisor or the registrar's office for help. (And if they can't figure out why you're blocked from withdrawing, ask them to make sure there's a census date for the course, the term or subterm, and your registration group.)