Add/Drop Courses
Use the Add/Drop feature to find courses and register for them. You can also drop courses, request advisor approval, check your account information, and pay for courses.
Tip
The Add/Drop Courses feature is also called the Course Schedules feature in some places, such as the Global Portlet Operations page.
Note
You can add courses only when the Add Period is open and drop courses only when the Drop Period is open.
Feature Overview
Add/Drop Courses shows courses already on your schedule, courses awaiting advisor approval, and courses requiring payment. There are three Campus Portal products that use the Add/Drop feature: Candidate, Registration, and Student.
Candidate
The school may make part of this feature available to prospective students or the public. If so, you can search for courses and view course information. Some courses may be available for you to register. You may need to apply for a login.
Registration
Warning
The Student Registration feature is intended to replace the Add/Drop Courses feature. The Student Registration feature encompasses the elements of the Add/Drop feature, but it is greatly enhanced so that students are guided to register for courses that fit their academic plan or degree audit.
Student
Students will see details and information on courses they've already registered for, as well as additional links to help search, add, and drop courses. Studnets can also use the My Account Info link to see balances and statements.
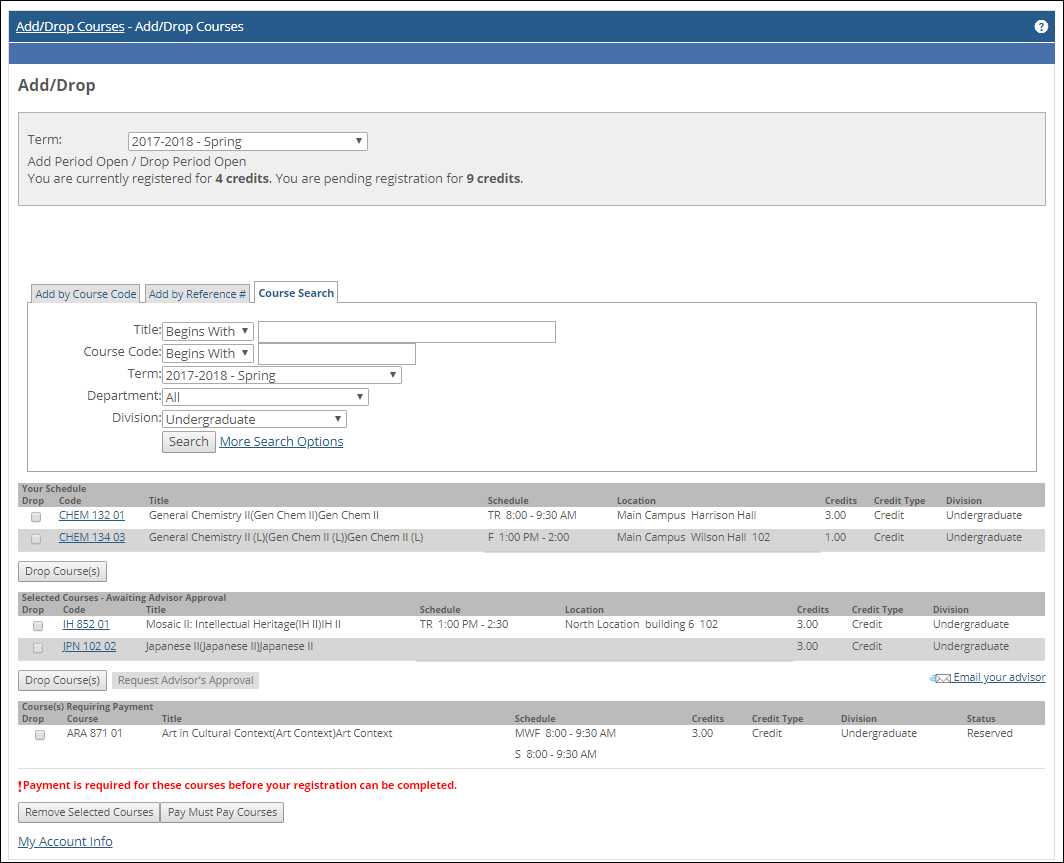
There are three methods for adding courses. Each method has its own tab on the feature page: Course Code, Reference Number, and Course Search.
You can enter course codes and section numbers. Just begin typing to open a drop-down list of courses that match what you've typed so far. You can enter up to six courses.
On the Add by Course Code tab, enter up to six course codes. You can begin typing a course code and then select the code from the drop-down list.
Click the Add Course(s) button. A message appears telling you that your courses were registered or listing problems registering the courses.
You can also enter reference numbers if your school uses them. (Faculty and administrators might call them "request numbers.") A reference number is a short code for a section. The reference code is found on the Course Details page for each course. You can enter up to six reference numbers.
Obtain a course's reference number from its Course Details page.
On the Add by Reference # tab, enter up to six reference numbers.
Click the Add Course(s) button. A message appears telling you that your courses were registered or listing problems registering the courses.
The Course Search tab has both simple and advanced search options. The simple search is often enough to find a course. The advanced search includes many more fields to search such as faculty, meeting schedule, location, and hours.
Note
Make sure you select a term.
Select the Course Search tab.
For a simple search:
Select a Term from the drop-down list.
Enter search phrases in any of the other fields you wish. It's okay to leave fields blank.
Click the Search button.
If you need to search more fields:
Click More Search Options.
Enter search phrases and make selections as you wish to narrow your search.
If you need to clear your selections, click the Reset button, and make new selections.
Click the Search button. The Search Results page appears.
The Search Results page shows all the courses that match your search selections. You can change selections and search again.
Each course code in the results list is a link to the course's details.
On the Search Results page, click a Course Code for more information about the course.
Course details will include Reference Code, Credits, Clock Hours, Location, and Schedule. You can also email the instructor from this page.
On the Search Results page, select the courses you want to add.
Click the Add Courses button. A message tells you whether the course was successfully added to your schedule.
A message appears telling you that your courses were registered or listing problems registering the courses.
On the Add/Drop page, you can drop courses on your schedule.
On the Add/Drop page, select courses you want to drop.
Click the Drop Course(s) button.
A message tells you whether the course was successfully dropped.
Tip
Courses that display in the Courses Requiring Payment section require payment in full before the registration is considered complete. Depending on your school's settings, the course may automatically be dropped after a certain time period if it hasn't been paid for.
On the Add/Drop page, select the Must Pay courses you want to pay for.
Click the Pay Must Pay Course(s) button.
The Payments feature guides you through making your payment. Once the Payment process is completed and approved, a link to Return to Course Schedules appears.
The course moves to the Your Schedule (Registered) section of your schedule.
Note
If a course requires payment, you can remove it or make the payment. Several course charges may be defined for a course. They're combined into a single row and displayed in the Amount column.
On the Add/Drop page, select the Must Pay courses you want to remove.
Click the Remove Selected Courses button.
If your advisor must approve any added courses, those courses are listed in the Awaiting Advisor Approval box. You can request advisor approval for those courses.
On the Add/Drop page, select the courses that need approval.
Click the Request Advisor Approval button.
If you have more than one advisor, select the appropriate one, and then click the Send Email button.
A message tells you that your advisor has been notified that your schedule is ready to be reviewed.
Click the My Account Info link.
Click the My Account Balances link or the Course and Fee Statement link.
If you click the My Account Balances link, the account balances are retrieved and displayed. You can:
View transaction details of accounts by clicking the appropriate link.
Click the View Payment Plan link to view current payment plans for accounts.
Click the Make a Payment link to make a payment on any or all of your accounts.
Click the Course and Fee Statement link to view this statement. On the ensuing screens, click the Generate My Course and Fee Statement link and then the View My Course and Fee Statement link to display the detailed statement in PDF format.
If you click the Course and Fee Statement link, you can do this to display the detailed statement in PDF format:
Click the Generate my Course and Fee Statement link.
Then click the View my Course and Fee Statement link.
If the school allows the public or prospective students to register for courses, they'll make a Public Registration Login Password Request Form available.
Complete the form.
The Account Notification feature sends you login and password information.
Any of a number of conditions can prevent you from adding a course, including these:
The registration period isn't open.
You need clearance before you can register.
You need to resolve holds before you can register.
You need to pay for the course first.
Your advisor needs to approve the course.
Use the buttons and links on your Schedule to get approvals and clearance or to contact your advisor.
If your school uses the Student Registration feature instead of the Add/Drop Courses feature, you can withdraw yourself from courses under certain circumstances. But if your school uses the Add/Drop Courses feature, you'll need your instructor, advisor, or the registration office to withdraw you.