Workflow Data Points
Important
Information and features vary according to the roles to which you belong and the permissions associated with those roles. For more information, contact your module manager or your campus support team.
Data points are values that are passed from FormFlow - Forms that can be used to automate procedures in a Workflow stage. For example, a Check Amount data point can be defined for a check approval track. When a form is submitted to a track, the track will request the Check Amount value from the calling application. These can then be used in Stage Rules to automatically approve or reject the document.
Note
To pass a specific piece of data from FormFlow to Workflow to be used in automated procedures or email templates, a data point must be created in Workflow. Then, in FormFlow's Workflow Configuration option, the data point is configured at the same time as its Workflow track, allowing the data point to be passed to Workflow when a document is submitted to that track.
Log into the Campus Portal as an administrator.
Navigate to the Workflow feature.
Click the Admin this portlet link.
On the Tracks tab, click Add Track.
On the Definition tab, type in the Name and Description of the approval track into the corresponding fields.
Note
The Name of the track will be what users see in FormFlow - Forms when they select a track option to be used upon submission of the form. The Description is only available to administrators and is used to give more detail about the track.
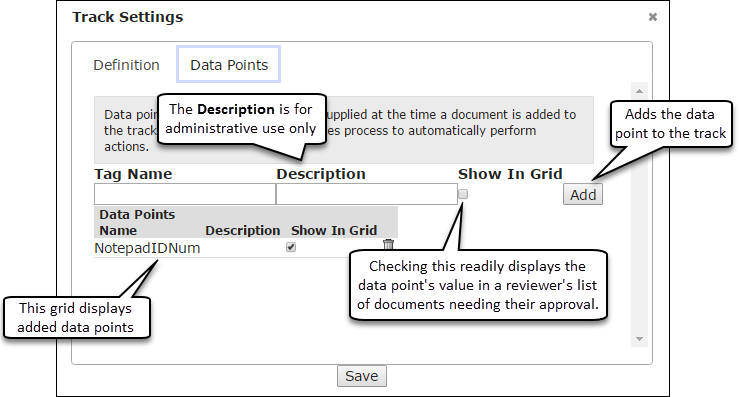
Click on the Data Points tab.
Note
Data points are values that are passed from Forms that can be used to automate procedures in a Workflow stage.
Enter in the Tag Name and Description for the data point.
Select the Show In Grid checkbox to indicate that the value passed to Workflow should be readily available when approvers review the documents they need to approve.
Click the Add button when you finish entering the data point.
Repeat steps 6-9 to add as many data points as needed.
Click Save changes.
Note
After the track has been created, you can click Track Settings on the track's Admin Toolbar to edit the name, description and data points of the track.