Course Authorization Setup
Important
Information and features vary according to the roles to which you belong and the permissions associated with those roles. For more information, contact your module manager or your campus support team.
Perform the following steps to configure J1 Desktop to support the Course Authorization feature.
Open the Registration Configuration window.
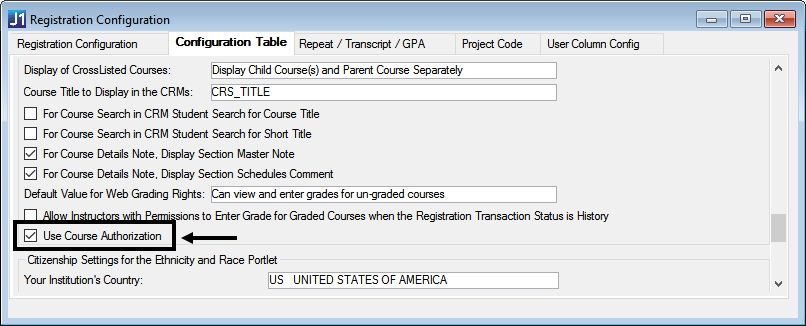
Click the Configuration Table tab.
Select the Use Course Authorization checkbox.
Save.
Open the Faculty Information window.
In the Course Authorizations group box:
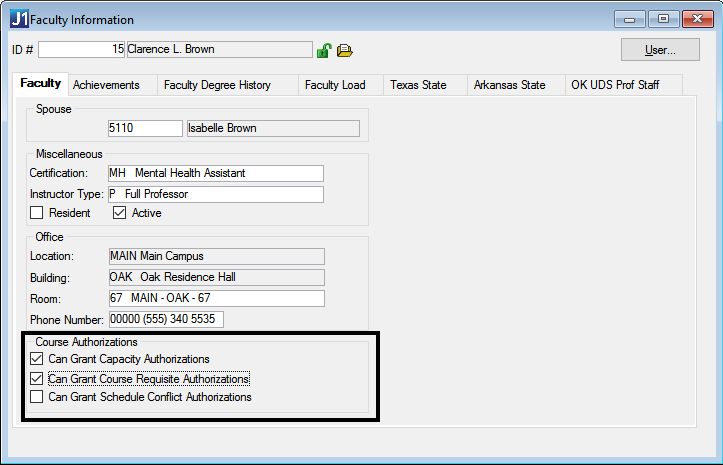
Select the Can Grant Capacity Authorizations checkbox for each faculty member who will be able to authorize in the Campus Portal that selected students can register for a course in spite of the Course Capacity error that occurs at the time of registration.
Select the Can Grant Course Requisite Authorizations checkbox for each faculty member who will be able to authorize in the Campus Portal that selected students can register for a course even though the student has not met the prerequisite requirement, taken the corequisite course, or is attempting to take a course prohibited because the student took a certain course previously.
Select the Can Grant Schedule Conflict Authorizations checkbox for each faculty member who will be able to authorize in the Campus Portal that selected students can register for a course in spite of a schedule conflict error that occurs at the time of registration.
Save.
Open the Maintain Advisors window.
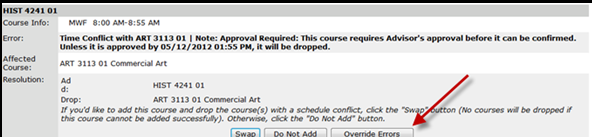
When the Advisor has been granted any of these authorizations and if the error with the Swap option occurs at the time the Advisor is attempting to register a student, the Advisor is presented with an Override Errors button to allow registration of the selected course without having to Swap the selected course for the existing registration.
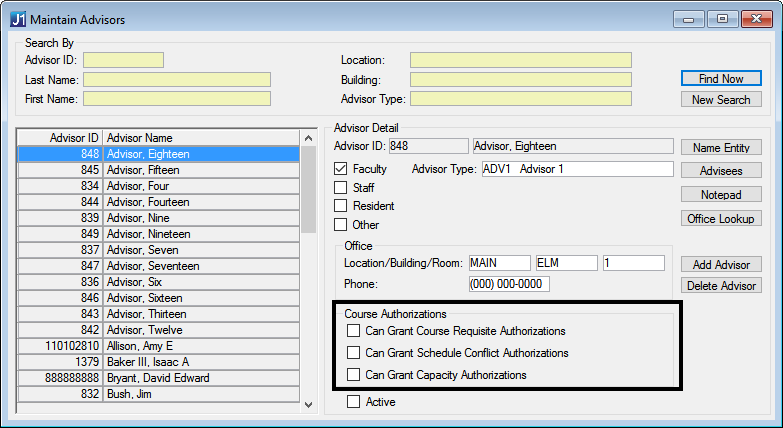
Select the Can Grant Capacity Authorizations checkbox for each advisor who will be able to authorize in the Campus Portal that selected students can register for a course in spite of the Course Capacity error that occurs at the time of registration.
Search for the appropriate Advisor by entering search criteria and clicking the Find Now button.
Select the Can Grant Course Requisite Authorizations checkbox if you want to allow this advisor to authorize in the Campus Portal that selected students can register for a course in spite of the requisite error that occurs at the time of registration.
Select the Can Grant Schedule Conflict Authorizations checkbox if you want to allow this advisor to authorize in the Campus Portal that selected students can register for a course in spite of the schedule conflict error that occurs at the time of registration.
Save.
Open the Course Authorization Permission Config window.
Select the Advisors Can Authorize All Courses checkbox if you want all advisors who are a member of the Advising Group and who have access to the Course Authorization feature to be granted permissions to view all courses in that feature and, if they are granted permissions on the Maintain Advisor window, to perform the capacity, schedule conflict, and requisite course authorizations on all courses.
Note
The Advisee Roster feature is not affected by this checkbox.
If you wish to use the Course Authorization Synchronization process to allow deans or department chairs to do Course Authorizations for the courses of instructors who report to them, then you should set the values in the Active Courses Defined By and the Active Courses Valid Date sections. The Course Authorization Synchronization process assigns Authorization Groups on the Faculty tab of the Courses window or the Faculty Load window.
The Active Terms box displays the terms for which course authorization is being configured. To change the active terms, click the Browse button. Then select the appropriate terms from the Select Years Terms window.
IN the Active Courses Valid Date group box:
Enter the Start Date for the time period for which the active terms are valid.
Enter the End Date for the time period for which the active terms are valid.
Enter the Reminder Date for the approaching End Date for the selected active terms. When this date has passed, a reminder message is displayed when the Synchronize Course Permissions window is opened.
To allow users to manually assign authorizations on the Faculty tab of the Courses window or on the Faculty Load Table window:
In the Manual Group Assignment Controls group box, select the Allow Filters? checkbox.:
Select the filters you want. (This will put a right-
Save.
Note
The Filters 1-5 are used to filter the Course Authorization Groups on the Assign Groups window. The filtering is done by matching the values assigned to the groups against the same columns' values from the selected course. This process is used when assigning Authorization Groups on the Faculty tab of the Courses window or the Faculty Load window.
Open the Maintain Authorization Groups window to define groups and the criteria to select the instructor for that group for which to update instructor course permissions for doing authorizations in the Course Authorizations feature and access to other instructors' courses via the Faculty Course Control feature.
Right-click on the data pane on the left-hand side of the window, and select Add Authorization Group.
On the Detail tab:
Enter Group Code and Description.
If a Query is to be used for this Authorization Group, select Query Source and Query.
The Begin Date defaults to today's date. Edit as needed.
Leave the End Date at 00/00/0000. This date will be updated when the group is made inactive).
Select the Authorization Group Status. By default, this is set to Active for a new group.
If Filters 1-5 are set up on the Course Authorization Permission Config window, select any values that apply to the group.
Save.
These settings can be done by the Student Administrator and/or Advisor Administrator, depending on which role you want to do the setup. These settings will be applied to all instances (copies) of the feature, regardless of the feature page on which the feature is located.
Log in to the Campus Portal as an administrator and navigate to the appropriate feature page.
From the Admin Toolbar
 , click Access. The Access page appears. Campus Portal roles that have access to that page are indicated by a green visible
  symbol while roles that do not have access are indicated by the red hidden
  symbol.
Click on the Campus Portal role you are setting up permissions for. If the role has not already been granted access to the page, click the button to toggle it to Visible
 . Additional permissions appear.
To grant administrative privileges to a Campus Portal role, click the button for the Allow this role to manage this page permission to move the toggle to "Yes". Administrative permissions will allow the users in the role to add or remove features and set page and feature level permissions.
From the Course Authorizations feature, click the Setup menu option. The Portal Settings page appears.
Using the checkboxes, indicate which of the Authorization options you wish Course Authorization users to be able add and delete in the Course Authorizations portlet and for which Advisors can perform overrides in the Course Schedules portlet as part of the Advisor Approval process.
Select the Requisite, Capacity, Schedule Conflict, and/or Registration Permission Required checkboxes to make those authorizations appear in these places in the portlet:
On the Add Authorization screen | Authorization Condition drop-down
In the count of authorizations | Total Authorizations column
On the Authorizations Granted list | Condition column
Select any of the Allow users . . . checkboxes to allow users on the portlet to grant authorizations to students and to remove them.
Click the Save button.
From the Course Authorizations feature, click the Set Options menu option. The Portal User Options page appears.
Select the checkboxes beside the Name Search Options you wish to have the Name Search process use.
Search Using Phonetic Match: a phonetic or Soundex match
Search Using Primary Name: LAST_NAME, FIRST_NAME, and/or MIDDLE_NAME fields in the ID record
Search Using the Alternate Name Type: NICKNAME, PREFERRED_NAME, BIRTH_NAME, or other name fields in the ID record
In Default Authorizations Sort Order, select the appropriate value in the Sort Column drop-down by which the Authorization Granted should sort when the Course Authorization Details screen is displayed:
Student
Condition
Reason
Click the Save button.