Defining a Form's Settings
Each form has Form Settings that govern the behavior of the form. The available settings for the currently selected form are displayed at the top left portion of the Form Builder: Name of your form screen.
Note
Not all of the settings described here are available for all form types. Only the setting types that are appropriate for the form being edited will have a link displayed.
Additionally, not all of the settings available in a particular form screen are applicable to all form types. In these cases, the specific settings will be hidden on the screen.
Each form is required to have at least a form name; however, there may be other basic form settings that are available for the form you are editing. Another option for specifying basic form settings is to import the settings from another existing form.
Create New Settings
Open the form for editing.
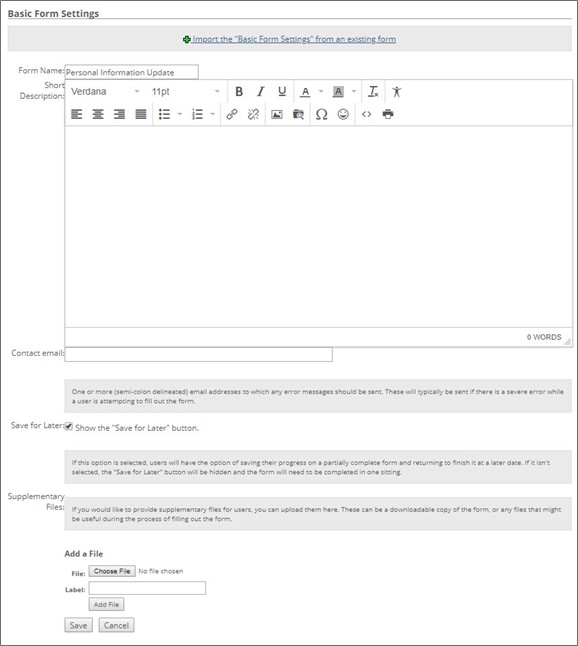
Click the Edit basic form settings link, which displays the Basic Form Settings screen.
Do any of the following, as appropriate and available for the type of form you are editing:
Use the Form Name field to change the name of the form (required).
Note
The names of the Donor Profiles forms can not be modified since they are tied to a particular data category.
Use the Short Description field to change the description of the form. This description may or may not be displayed to the user filling out the form, depending upon the feature with which the form is associated.
Use the Contact E-mail field to indicate to which e-mail address(es) an error message should be submitted.
If you wish to allow a user to save their entered data to be completed at a later time, check the Show the "Save for Later" button checkbox.
If there are any files you wish to have available on the form as a link for the user to download, use the fields in the Supplementary Files portion of the screen to browse to a File and add the file using the specified Label.
Click Save to save your edits and return to the Form Builder: Name of your form screen.
Import Existing Settings
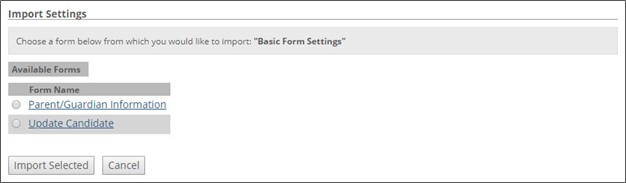
Click the Import the "Basic Form Settings" from an existing form link at the top of the Basic Form Settings screen, which displays the Import Settings screen.
Select the radio button option for the form you wish to use, and click the Import Selected button.
You return to the Form Builder: Name of your form screen, having imported the data from the selected form.
If the Set up payment options link is available for the form you are editing, you have the ability to specify that a payment may be required in order to submit the form. Another option for specifying payment options is to import the Payment Options settings from another form.
Note
By default, the form is defined to not require a payment.
Create New Payment Options
Open the form for editing.
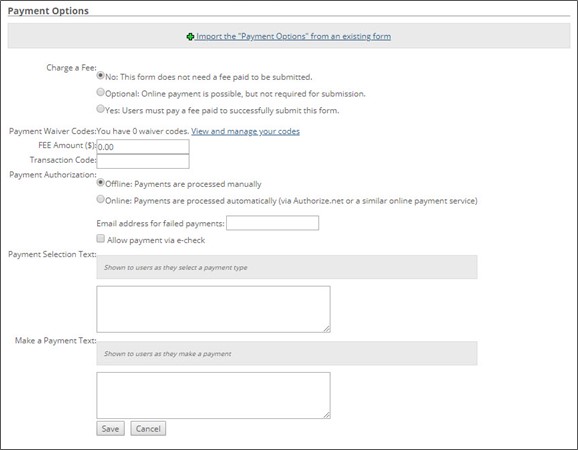
Click the Set up payment options link, which displays the Payment Options screen.
Do any of the following, as appropriate:
Use the Charge a Fee radio button options to indicate whether or not the form does not require a fee, requires a fee, or if a fee is optional.
Update the Payment Waiver Codes.
Use the FEE Amount ($) field to change the fee amount.
Use the Transaction Code field to define the code to use for submitting the payment information to a third-party processor.
Use the Payment Authorization radio button options to show whether the payment should be processed offline or online.
Enter an email address into the E-mail address for failed payments field if desired.
If payments should be allowed to be in an e-check form, check the Allow payment via e-check checkbox.
Use the Payment Selection Text to define the text that will be displayed to the user as they select a payment type.
Use the Make a Payment Text to change the text that will be shown to the user as they make a payment.
Click Save to save your edits and return to the Form Builder: Name of your form screen.
Import Existing Payment Options
Click the Import the "Payment Options" from an existing form link at the top of the Payment Options screen to display the Import Settings with a list of defined forms.
Select the radio button option for the form you wish to use, and click the Import Selected button.
You return to the Form Builder: Name of your form screen, having imported the data from the selected form.
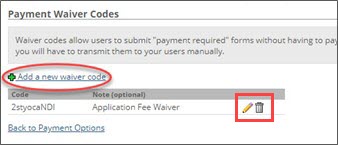
If you wish to make use of waiver codes to allow users to submit a form without entering the required payment info, you need to define one or more waiver codes through the Payment Options screen. Waiver codes are only applicable if the form is defined to require a payment or if the form has the optional payment option selected. If waiver codes are defined for a form, the user filling out the form will have the option of entering in a waiver code on the Review and Submit screen.
Use the following steps to create, edit, and delete waiver codes for a form:
Click the View and manage your codes link for the Payment Waiver Codes option on the Payment Options screen. The Payment Waiver Codes screen is displayed.
To create a new waiver code:
Click the Add a new waiver code link. An editable field is displayed in the Code and Note (optional) columns.
The Code column will have a system-generated unique code displayed. Leave the generated code as is, or change it to your own code value.
Enter note text if desired.
Click Save. The new waiver code is saved and displayed along with any other existing waiver codes.
To edit an existing waiver code:
Click on the pencil icon (
 ) to the right of the waiver code. The Code and Note (optional) fields become editable for the selected waiver code.
Edit the code and/or note text as you wish.
Click Save. The updated waiver code is displayed with any other waiver codes.
To delete an existing waiver code:
Click on the trashcan icon (
 ) to the right of the waiver code.
The “Are you sure you want to delete this Waiver Code?" prompt is displayed.
Click OK. The selected waiver code is deleted from the list of waiver codes.
Click the Back to Payment Options link to return to the Payment Options screen.
The number of defined waiver codes is updated accordingly.
Note
Remember, if you wish for a user to be able to enter a waiver code for a form, you need to supply the user with an appropriate waiver code prior to the user submitting the form.
If you wish to define a text message to be displayed to the user and/or an e-mail message to be sent to the user upon a successful or unsuccessful submission, then you need to set up the completion messages. Another option for setting up completion messages is to import the the Completion Messages from another form.
Note
By default, no completion messages are defined for a form.
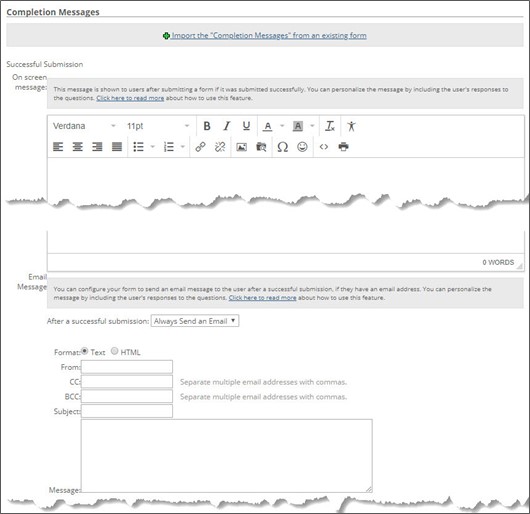
Create New Completion Messages
Open the form for editing.
Click on the Set up completion messages link, which displays the Completion Messages screen.
In the Successful Submission portion of the screen, edit any of the following, as appropriate:
Use the On screen message field to enter any text to display to the user on the screen upon a successful submission.
Select the desired option from the After a successful submission drop-down menu. Available options are Always Send an E-mail, Ask the User, and Never Send an E-mail. The default option is Always Send an E-mail.
If either the Always Send an E-mail or the Ask the User option is selected, you need to enter values into the following fields:
From
Subject
Message
Body
You can include details and information from the form [see Personalizing Completion Messages].
The remaining fields are optional.
In the Unsuccessful Submission portion of the screen, edit any of the following, as appropriate:
Use the On screen message field to enter any text to display to the user on the screen upon an unsuccessful submission.
Select the desired option from the After an unsuccessful submission drop-down menu. Available options are Always Send an E-mail, Ask the User, and Never Send an E-mail.
Note
The default option is Always Send an E-mail.
If either the Always Send an E-mail or the Ask the User option is selected, you need to enter values into the following fields:
From
Subject
Message
Body
You can include details and information from the form [see Personalizing Completion Messages].
The remaining fields are optional.
Click Save to save your edits and return to the Form Builder: Name of your form screen.
Import Existing Completion Messages
Click the Import the "Completion Messages" from an existing form link at the top of the screen to display the Import Settings with a list of defined forms.
Only forms that have completion messages already defined have a radio button option available. Select the radio button option for the form you wish to use, and click the Import Selected button.
You return to the Form Builder: Name of your form screen, having imported the data from the selected form.