Setting Up Payment Plan
J1 Desktop Setup
On this window, there are three fields that determine what is included in the student’s balance:
Display Preliminary Financial Aid Online?
Display Preliminary Charges Online?
Display Unposted Items Online?
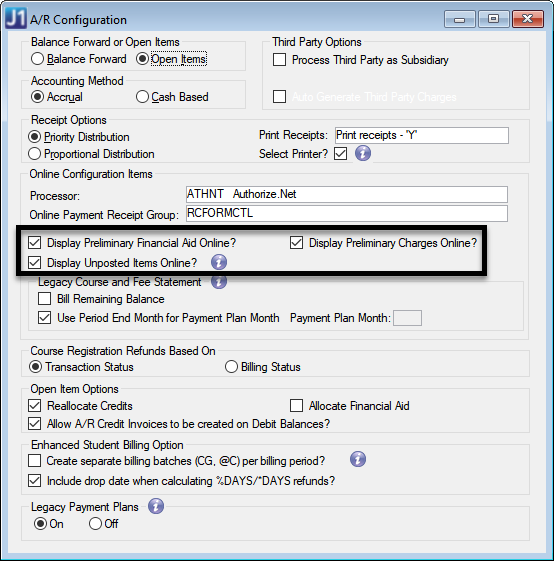
Check the A/R Configuration window to make sure the settings are correct for the unposted, suspended, unapplied financial aid, and preliminary charges when calculating the student’s balance.
A student's account balance is calculated using flags from General Ledger. Three flags are checked to verify student account balances. Be sure you have properly setup the following flags so the student account balances will calculate with the correct amounts:
Include in Account Balance checkbox on the A/P & A/R Subsidiary Definitions window
Payment Source Code? checkbox on the Define Journal Source Codes window
Include in Payment Plan Balance checkbox on the Define Journal Source Codes window
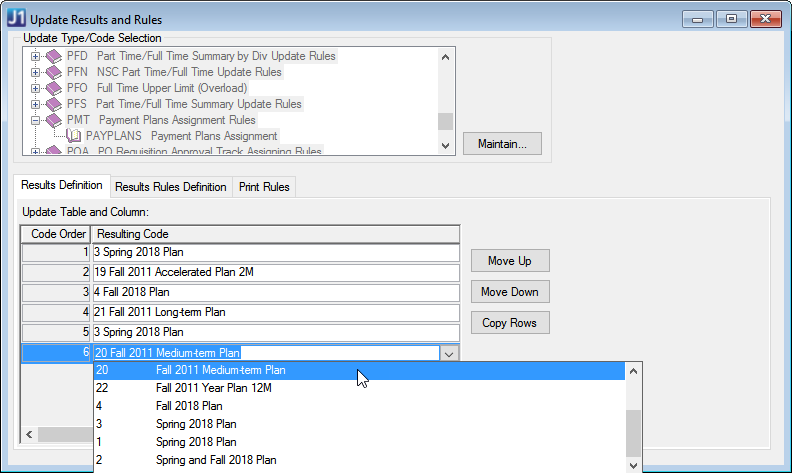
Create payment plan options for students.
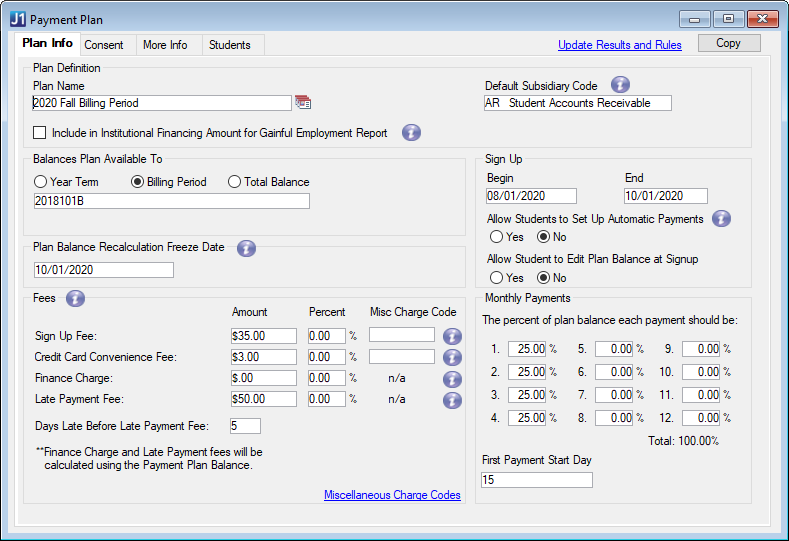
The details you enter on the Plan Info tab will be used to find eligible students when the Payment Plan Assignment process is run.
Tip
If you associate fees with the payment plan, Miscellaneous charges will automatically be created, as needed, to ensure the fee payments do not come out of the plan balance.
Note
Be sure to name your payment plans appropriately. Using the time period and the number of monthly payments could be helpful as students are deciding which plan to choose (for example, Fall 2018 12M Plan or Fall 2018 6M Plan) You could also describe the length of monthly payments (for example, Fall 2018 Long-Term Plan or Fall 2018 Accelerated Plan).
The Manage Payment Plans window allows you to search for payment plans, create new payment plans, and to review, edit or delete existing plans, and set up email notifications.
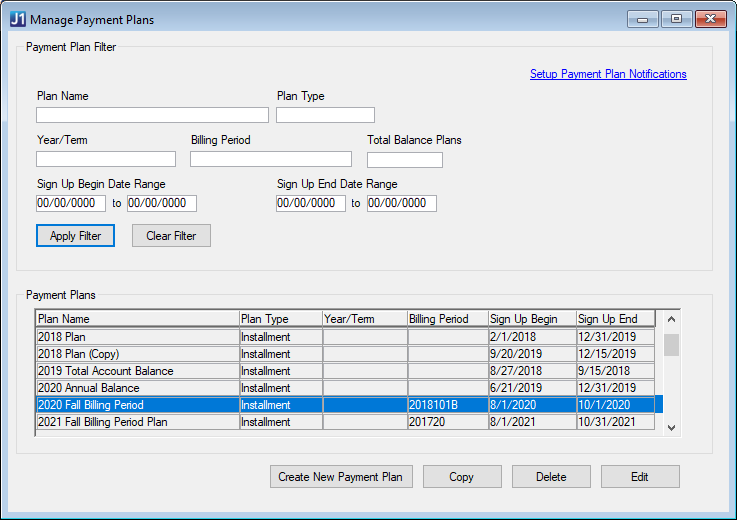
Click the Setup Payment Plan Notifications link in the top right corner of the window to customize messages and determine who receives a message. Select the On radio button.
 |
Note
You will need to set up and turn on notifications from this window if you want students to receive email notifications for their payment plans.
Tip
Payment plan notifications can be set up for the following payment plan events:
Consent to Payment Plan
Next Payment Due
Payment Past Due
Finance Charge/Late Payment Fee Charged
Payment Made
Change to Plan Balance
In order for a student to see a payment plan, the student must be eligible for the plan. Eligible plans must be assigned through the Payment Plan Assignment window in J1 Desktop once the Payment Plan Assignment rules/criteria have been defined in the Update Results and Rules window.
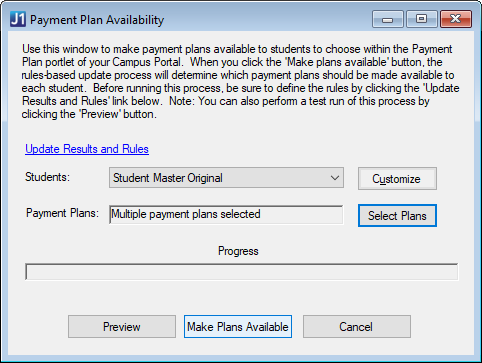
There are three standard queries available that will retrieve a list of students you want to assign payment plans to:
Student Master Original: Using this query will review all students in the student master table against the payment plan rules-based updates to determine if any of those students are eligible for payment plans.
Student Course History Original: Using this query will review all students in the student course history table against the payment plan rules-based updates to determine if any of those students are eligible for payment plans.
Student Division Master Original: Using this query will review all students in the student division master table against the payment plan rules-based updates to determine if any of those students are eligible for payment plans.
If students are eligible, the available payment plans will appear in the student’s Campus Portal and allow them to review and choose plans based on their need.
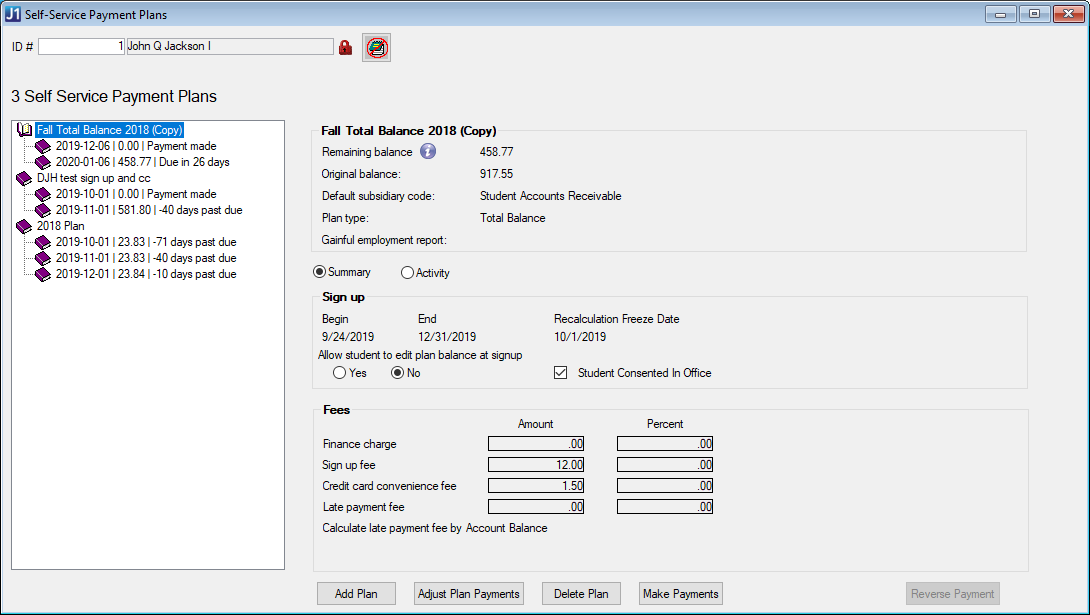
Once eligible plans are made available to students in the Payment Plan Assignment process, students will have the option of signing up for those plans in the JICS Campus Portal. If you need to add a plan to a student manually, you can use the Self-Service Payment Plans window.
Warning
Make sure the student has consented to the plan before adding it to their account.
Campus Portal Setup
Log in to the Campus Portal as an administrator and navigate to the appropriate feature page.
From the Admin Toolbar
 , click Access. The Access page appears. Campus Portal roles that have access to that page are indicated by a green visible
  symbol while roles that do not have access are indicated by the red hidden
  symbol.
Click on the Campus Portal role you are setting up permissions for. If the role has not already been granted access to the page, click the button to toggle it to Visible
 . Additional permissions appear.
To grant administrative privileges to a Campus Portal role, click the button for the Allow this role to manage this page permission to move the toggle to "Yes". Administrative permissions will allow the users in the role to add or remove features and set page and feature level permissions.
Changes are saved automatically
Warning
When you open the Payment Plans Settings page, you may see a warning at the top of the page if your school is not using the launch out hosted payment form. If you see this warning, the Make a Payment buttons will not appear in the Campus Portal, and students will not be able to make online payments.
As an administrator, you are able to edit the text that will introduce payment plans to students.
Log in as the Campus Portal administrator.
From the Payment Plan feature, click the Settings
 option.
In the Payment Plan Introduction text field type an introduction that will explain what payment plans are and any additional information you want your students to know.
In the Automatic Payment Instructions text field, enter information and steps a student should consider when selecting the automatic payment option during the payment plan sign up.
When you’re finished, click Save changes.
Note
Jenzabar provides generic text for these sections; however, you should customize this text for your school.
Tip
Students and/or parents can set up recurring payments on their payment plans. When a recurring payment is complete, the system's next run for daily processes will add the payment information in general ledger as receipt transactions and update the payment plan balance.
Warning
When you open the Payment Plans Settings page, you may see a warning at the top of the page if your school is not using the launch out hosted payment form. If you see this warning, the Make a Payment buttons will not appear in the Campus Portal and students will not be able to make online payments.
As an administrator, you are able to edit the contact information that students will use when they have questions about their current and possible payment plans.
Log in as the Campus Portal administrator.
From the Payment Plan feature, click the Settings
option.In the Contact Email text field, enter a valid email address for the person or office that will be responsible for answering student questions about payment plans.
In the Contact Phone Number text field, enter the phone number for the person or office that will be responsible for answering student questions about payment plans. Do not use dashes or parenthesis (for example 5555740911).
When you are finished, click Save Changes.
Warning
If you want online payments to be available, you must add the Payment Checkout feature to a page in your Campus Portal. If this feature is not added, the Make payment and Pay Ahead buttons will be inactive.
The Payment Checkout feature enables the launch out to Authorize.Net for online payments. While this feature cannot be used alone, it is required for the My Financial Accounts, Payment Plan, and Student Home Page features if you want students to be able to make payments through the JICS Campus Portal.
Note
While the Payment Checkout feature must be added to a page, users will not be able to make payments directly from the page. Instead, if a user accesses the Payment Checkout page directly from the navigation, they will see a note that the portlet can only be accessed from the My Financial Accounts or Payment Plan portlets.
Warning
If you want online payments to be available, you will need to make sure you are using Authorize.Net as a hosted payment form. If this is not set up, the Make payment and Pay Ahead buttons throughout the Campus Portal will be inactive.
Log in to the Campus Portal as an administrator and navigate to the Online Payment Administration feature.
Click the Click here to administer the Payments Portlet link.
Make sure the Use Authorize.net hosted payment form? option is set to Yes.
Tip
For more information about setting up and using Authorize.Net see the Online Payment Administration section of the Help.